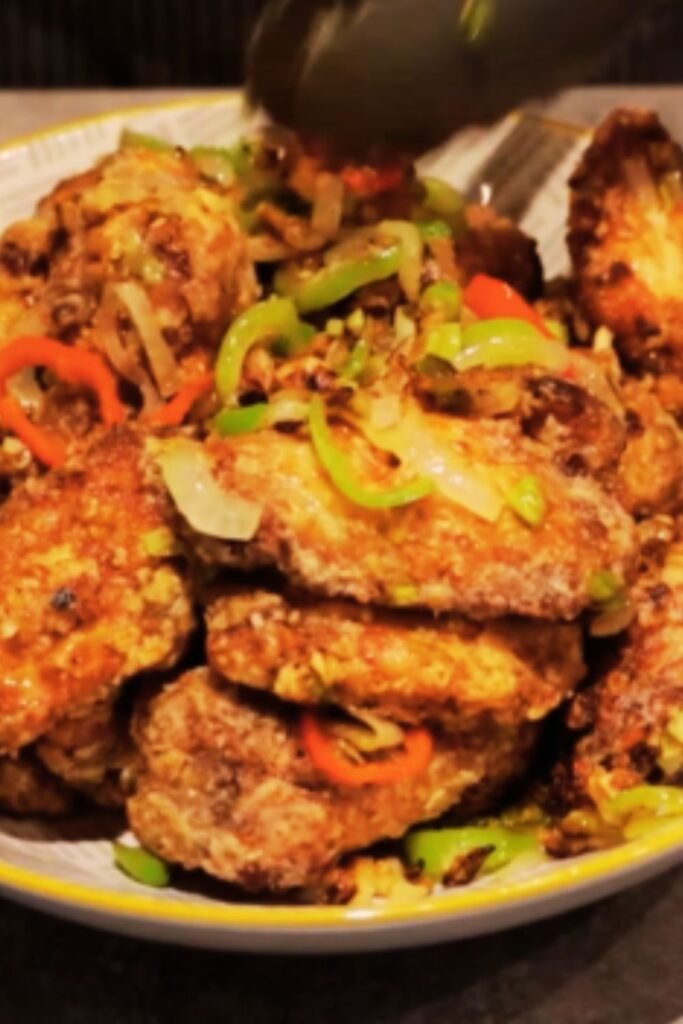
There’s something incredibly satisfying about biting into a piece of perfectly crispy chicken that’s been seasoned with the simple yet powerful combination of salt and pepper. This classic dish, popular in Chinese restaurants worldwide, has become my go-to recipe when I’m craving something with a perfect balance of flavor and texture. Today, I’m sharing my perfected recipe for Salt and Pepper Crispy Chicken that I’ve been refining for years through countless kitchen experiments.
When done right, this dish delivers chicken pieces with a gloriously crunchy exterior while keeping the meat inside tender and juicy. The aromatic mix of salt, pepper, and spices creates a flavor profile that’s bold yet beautifully balanced. What I love most about this recipe is how it transforms basic ingredients into something truly spectacular with just a few clever techniques.
What Makes This Salt and Pepper Chicken Special
Before diving into the recipe itself, let me share what makes this version stand out:
- Double-frying technique: This crucial method ensures maximum crispiness that stays crunchy even after the chicken has cooled slightly
- Balanced seasoning mix: My salt and pepper blend uses multiple peppercorn varieties for complex flavor
- Aromatic finish: The final toss with garlic, ginger, chilies, and spring onions elevates the dish to restaurant quality
- Versatile serving options: Works as an appetizer, main dish, or even as incredible finger food for gatherings
I’ve spent years perfecting this recipe, and I’m excited to share all my tips and tricks so you can create this crispy delight in your own kitchen!
Ingredients: Everything You’ll Need
For the Chicken Marinade:
- 1.5 pounds (700g) boneless chicken thighs, cut into 1-inch chunks
- 2 tablespoons Shaoxing wine (or dry sherry)
- 1 tablespoon light soy sauce
- 1 teaspoon sesame oil
- 1/2 teaspoon white pepper
- 1 teaspoon salt
- 1 egg white
For the Coating:
- 1 cup (125g) cornstarch
- 1/4 cup (30g) all-purpose flour
- 1/2 teaspoon baking powder
- 1/2 teaspoon salt
For the Salt and Pepper Seasoning:
- 1 tablespoon sea salt
- 2 teaspoons white pepper
- 1 teaspoon black pepper
- 1/2 teaspoon five-spice powder (optional but recommended)
- 1/4 teaspoon Sichuan peppercorns, toasted and ground (if available)
For the Aromatic Finish:
- 6 cloves garlic, minced
- 1-inch piece ginger, finely julienned
- 2-3 red chilies, thinly sliced (adjust to your heat preference)
- 4 spring onions, sliced into 1-inch pieces
- 1 small onion, diced
- 1 bell pepper, diced (optional)
Additional Items:
- Vegetable oil for deep frying (about 4 cups)
- Fresh cilantro leaves for garnish
- Lime wedges for serving
Equipment You’ll Need
Having the right tools makes this recipe much easier to execute:
- Deep heavy-bottomed pot or wok for frying
- Cooking thermometer (highly recommended for maintaining oil temperature)
- Slotted spoon or spider strainer
- Paper towels for draining
- Large mixing bowls
- Sharp knife and cutting board
- Spice grinder (if using whole peppercorns)
Step-by-Step Instructions
Marinating the Chicken
- Place chicken pieces in a large bowl and add Shaoxing wine, soy sauce, sesame oil, white pepper, and salt.
- Add the egg white and mix thoroughly, ensuring every piece is well-coated.
- Cover and refrigerate for at least 30 minutes, ideally 2-4 hours for deeper flavor penetration.
I find this marinade step absolutely crucial for developing flavor from within the chicken. The egg white also helps create a protective layer that keeps the meat juicy during frying.
Preparing the Salt and Pepper Seasoning
- If using whole peppercorns, toast them in a dry pan over medium heat for 1-2 minutes until fragrant.
- Grind the peppercorns to a medium-fine consistency using a spice grinder or mortar and pestle.
- Mix the ground peppers with salt and five-spice powder in a small bowl.
- Set aside 1 tablespoon of this mixture for the final toss.
The aroma that fills your kitchen during this step is absolutely intoxicating. I love customizing the pepper blend based on what I have available – sometimes adding a pinch of cayenne for extra heat or a touch of sugar for balance.
Coating the Chicken
- In a separate bowl, whisk together cornstarch, flour, baking powder, and salt.
- Remove chicken from the refrigerator and let it sit at room temperature for 10 minutes.
- Working in batches, thoroughly coat each piece of chicken in the cornstarch mixture.
- Shake off excess coating and place on a plate, ready for frying.
The key here is getting a thin, even coating on each piece. Too much coating will make the chicken heavy and doughy, while too little won’t give you that perfect crunch. I like to let the coated chicken rest for about 5 minutes before frying, which helps the coating adhere better.
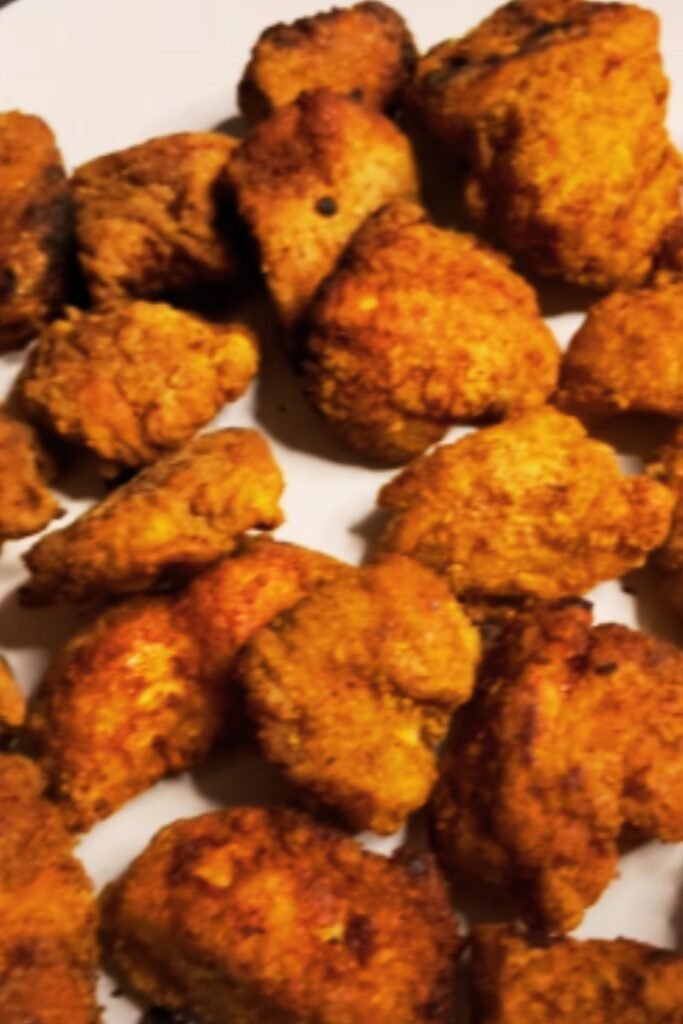
The Double-Frying Method
First Fry:
- Heat oil in your deep pot or wok to 325°F (165°C).
- Carefully add chicken pieces in small batches, being careful not to overcrowd the pot.
- Fry for 3-4 minutes until light golden and mostly cooked through.
- Remove with a slotted spoon and drain on paper towels.
- Repeat with remaining chicken.
Second Fry:
- Increase oil temperature to 375°F (190°C).
- Return all chicken to the hot oil and fry for another 1-2 minutes until deeply golden and ultra-crispy.
- Remove and drain on fresh paper towels.
- Immediately sprinkle with some of the salt and pepper seasoning while still hot.
This double-frying technique is the secret weapon for achieving that signature crispiness that stays crunchy even after the chicken has been tossed with aromatics. The first fry cooks the chicken through, while the second fry at a higher temperature creates that perfect crispy exterior.
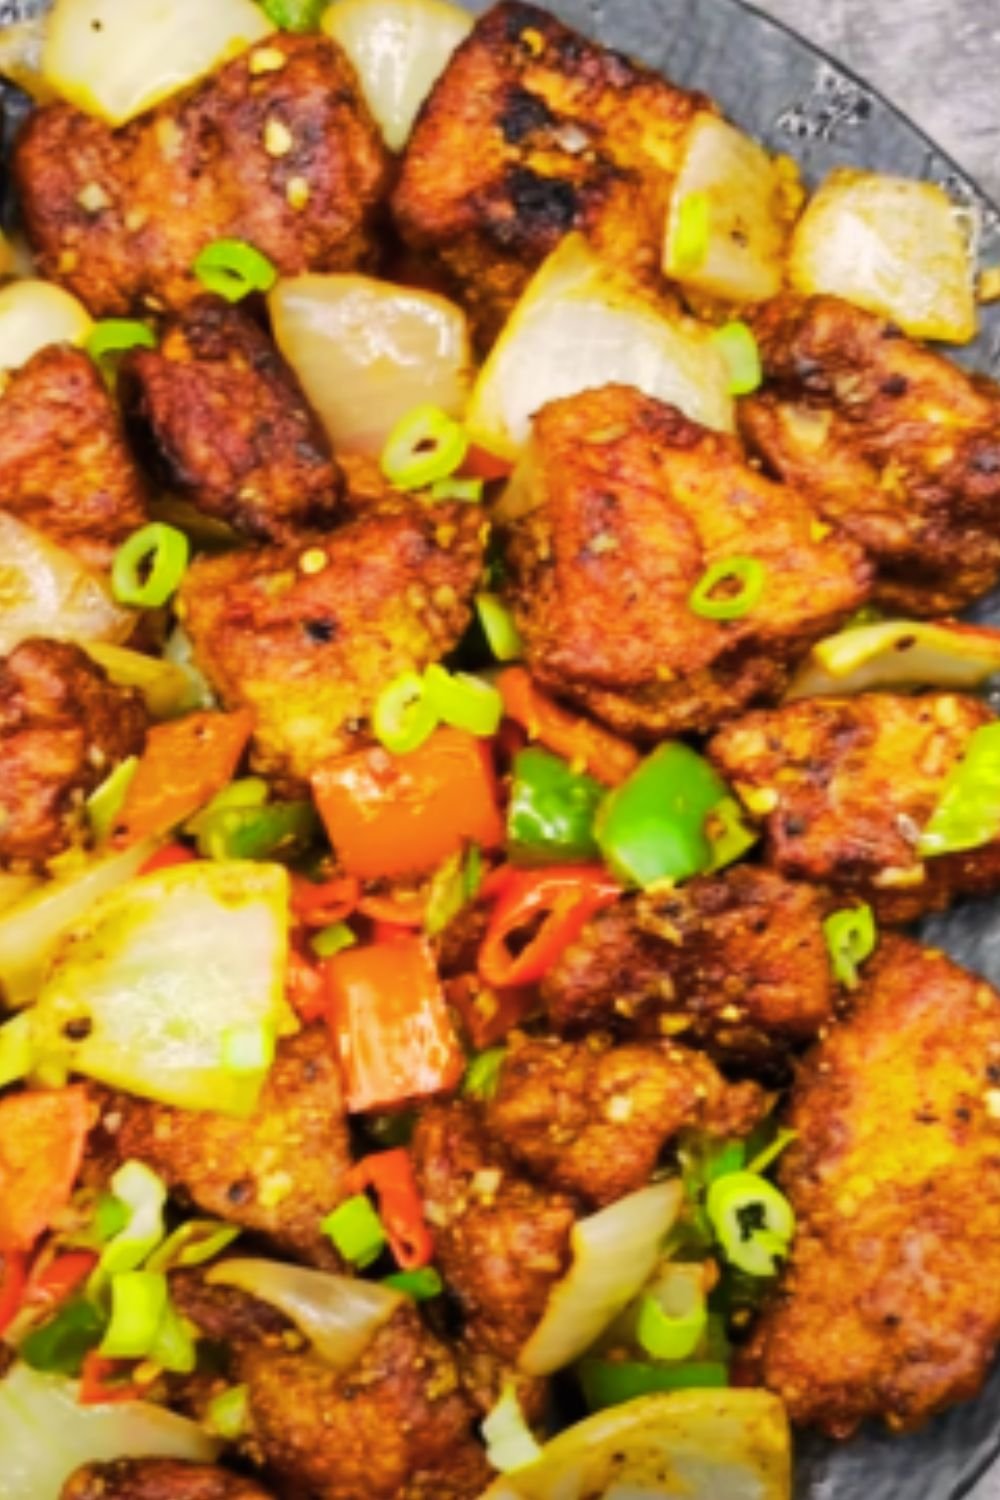
The Aromatic Finish
- Pour off all but 2 tablespoons of oil from your wok or use a separate pan.
- Heat the oil over medium-high heat.
- Add garlic, ginger, and chilies, stir-frying for 30 seconds until fragrant.
- Add diced onion and bell pepper (if using), stir-frying for another minute.
- Add spring onions and cook for 30 seconds more.
- Return the crispy chicken to the wok.
- Sprinkle with the reserved salt and pepper seasoning.
- Toss everything together quickly for about 30 seconds to coat the chicken with all the aromatics.
This final step is where magic happens. The hot aromatics infuse the crispy chicken with incredible flavor, creating a dish that’s far greater than the sum of its parts. I sometimes add a tiny splash of Shaoxing wine right at the end for an extra flavor boost.
Nutritional Information
For those who like to keep track of their intake, here’s the nutritional breakdown per serving (based on 4 servings):
| Nutrient | Amount per Serving |
|---|---|
| Calories | 485 kcal |
| Protein | 32g |
| Carbohydrates | 26g |
| Dietary Fiber | 2g |
| Sugar | 3g |
| Fat | 29g |
| Saturated Fat | 7g |
| Sodium | 1240mg |
| Potassium | 520mg |
| Vitamin A | 15% DV |
| Vitamin C | 45% DV |
| Calcium | 6% DV |
| Iron | 15% DV |
Note: Nutritional values are approximate and may vary based on specific ingredients used.
Variations to Try
I love experimenting with this recipe to create different flavor profiles. Here are some of my favorite variations:
Salt and Pepper Chicken Wings
Use chicken wings instead of boneless thighs for a perfect game day snack or party appetizer. Adjust cooking times slightly (they might need a bit longer on the first fry).
Salt and Pepper Tofu
For a vegetarian version, substitute extra-firm tofu for chicken. Press the tofu well to remove excess moisture before marinating. Reduce the first fry time to about 2 minutes.
Spicy Garlic Version
Double the amount of garlic and chilies in the aromatic mix, and add a tablespoon of chili oil at the final toss for a fiery variation that will clear your sinuses!
Citrus Salt and Pepper Chicken
Add the zest of one lemon and one lime to your salt and pepper seasoning mix for a bright, citrusy twist on the classic.
Serving Suggestions
Salt and Pepper Crispy Chicken is versatile and pairs beautifully with many sides:
- Steamed jasmine rice to soak up all the flavors
- Simple stir-fried vegetables like bok choy or Chinese broccoli
- A fresh cucumber salad dressed with rice vinegar for contrast
- Crispy noodles for added texture
- Sweet chili sauce or sriracha mayo for dipping

Storage and Reheating Tips
While this dish is best enjoyed immediately after cooking, here’s how to handle leftovers:
Storage:
- Refrigerate: Store in an airtight container for up to 2 days in the refrigerator.
- Freeze: Not recommended, as the texture will suffer significantly.
Reheating:
For the best results when reheating:
- Preheat your oven to 375°F (190°C).
- Place chicken pieces on a wire rack over a baking sheet.
- Reheat for 7-10 minutes until hot and crispy again.
- Avoid microwave reheating as it will make the chicken soggy.
Troubleshooting Common Issues
Problem: Chicken isn’t crispy enough
Solution: Make sure your oil is hot enough for both frying stages. The double-fry is crucial – don’t skip it! Also, ensure you’re not overcrowding the pot, which lowers the oil temperature.
Problem: Coating falls off during frying
Solution: Let the marinated chicken rest at room temperature before coating. Make sure the coating adheres well to each piece, and let the coated chicken rest for 5 minutes before frying.
Problem: Chicken is too salty
Solution: Remember that both the marinade and the finishing salt contain sodium. You can reduce the salt in either component or serve with plain rice to balance the flavors.
Problem: Interior is undercooked
Solution: Cut your chicken into consistent sizes and ensure the first fry is long enough to cook the chicken through. Using a thermometer, the internal temperature should reach 165°F (74°C).
Advanced Tips for Salt and Pepper Perfection
After making this dish countless times, I’ve discovered some pro-level tips:
- Toast your salt: For enhanced flavor, dry-toast your salt in a pan before grinding and mixing with the peppers.
- Corn flour alternative: For an even lighter coating, replace half the cornstarch with potato starch or rice flour.
- Temperature recovery: Let your oil recover to the proper temperature between batches. Frying cold chicken lowers oil temperature significantly.
- Balance your peppers: The perfect ratio for me is 2:1 white pepper to black pepper, but adjust to your preference.
- Coating rest: After coating the chicken, let it rest on a wire rack for 5 minutes before frying. This helps the coating adhere better.
Expert Comparisons: Restaurant vs. Homemade
Having ordered this dish at countless Chinese restaurants and making it at home for years, I’ve noticed some key differences:
| Aspect | Restaurant Version | My Homemade Recipe |
|---|---|---|
| Oil usage | Often uses more oil with longer frying times | Controlled oil amount with precise temperatures |
| MSG | Commonly added for flavor enhancement | Optional, not included in base recipe |
| Pepper quality | Variable, sometimes pre-ground | Freshly toasted and ground for maximum aroma |
| Chicken quality | Often uses cheaper cuts | Uses higher-quality boneless thighs |
| Vegetable content | Minimal, often just as garnish | Substantial amount for better nutrition |
| Customization | Limited to menu options | Completely customizable to preference |
| Freshness | Sits under heat lamps | Served immediately after cooking |
Frequently Asked Questions
Q: Can I use chicken breast instead of thighs?
A: Yes, you can use chicken breast, but it tends to dry out more easily. If using breast meat, reduce the cooking time slightly during the first fry (about 2-3 minutes) and be extra careful not to overcook. Brining the breast pieces first in a solution of 1 tablespoon salt to 4 cups water for 30 minutes can help keep them juicy.
Q: I don’t have a deep fryer or thermometer. How can I tell if my oil is at the right temperature?
A: You can test the oil by dropping in a small piece of bread or a drop of batter. At 325°F, the bread should take about 60 seconds to turn golden brown. At 375°F, it should brown in about 30 seconds. Alternatively, dip a wooden chopstick into the oil – if small bubbles form around it steadily, the oil is ready.
Q: Is there a good substitute for Shaoxing wine?
A: Dry sherry is the best substitute, but you can also use dry white wine, mirin (reduce other sweet elements if using this), or even chicken broth with a splash of rice vinegar in a pinch.
Q: How spicy is this dish?
A: As written, it’s moderately spicy. The heat comes primarily from the fresh chilies in the aromatic finish, so you can easily adjust by changing the quantity or removing the seeds for less heat. White pepper also adds a distinct type of spiciness that’s different from chili heat.
Q: Can I make this gluten-free?
A: Yes! Replace the all-purpose flour with rice flour or more cornstarch, and use tamari or gluten-free soy sauce in the marinade. Double-check that your five-spice powder is gluten-free as well.
Q: What’s the origin of Salt and Pepper Chicken?
A: This dish originates from Cantonese cuisine, particularly Hong Kong and Guangdong Province in China. It’s part of a style of cooking called “Salt and Pepper” (椒鹽) that can be applied to various proteins and even vegetables. The technique has become particularly popular in Western Chinese restaurants and has evolved to include the aromatic finish that gives it such wonderful depth of flavor.
Final Thoughts: Why This Recipe Works
What I love most about this Salt and Pepper Crispy Chicken is how it demonstrates that simple ingredients, when treated with proper technique, can create something truly extraordinary. The contrast between the crispy exterior and juicy interior, the punch of freshly ground peppers, and the aromatic finish create a dish that hits all the right notes.
For me, cooking is about more than just following instructions—it’s about understanding why certain techniques work and how flavors interact. This recipe embodies that philosophy, taking you through each critical step and explaining the reasoning behind it.
Whether you’re cooking for family, friends, or just treating yourself, this Salt and Pepper Crispy Chicken is sure to impress. It’s one of those dishes that makes people ask, “How did you make this?” – and now you know all my secrets!
I hope you enjoy making and eating this dish as much as I do. Don’t be afraid to make it your own by adjusting the spice levels or trying some of the variations. Happy cooking!