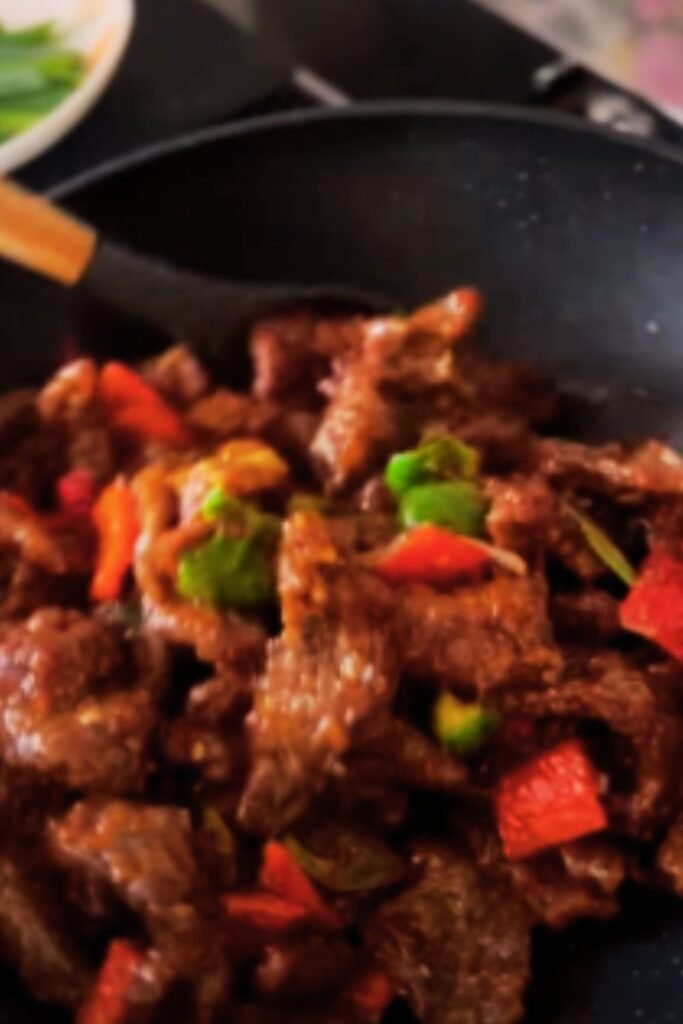
There’s something magical about that perfect plate of Mongolian Beef – tender slices of beef with crispy edges, coated in a glossy, sweet-savory sauce that clings to every bite. After years of testing and tweaking, I’ve finally perfected my version of this takeout classic, and I’m excited to share it with you today.
This isn’t just any Mongolian Beef recipe. It’s the result of countless kitchen experiments to find that perfect balance of flavors and textures that will make you forget all about ordering takeout. The beef is velvety tender, the sauce has that perfect sticky consistency, and the flavors pack a serious punch.
What Makes This Mongolian Beef Special
What sets this recipe apart from others is the technique of velveting the beef and the carefully balanced sauce that’s not too sweet, not too salty, with just the right amount of heat. I’ve also included some tricks to ensure your beef gets that amazing caramelized exterior while staying tender inside.
But first, let’s talk about what Mongolian Beef actually is (spoiler: it’s not Mongolian at all!)
The History Behind Mongolian Beef
Despite its name, Mongolian Beef doesn’t actually originate from Mongolia. It’s a Chinese-American creation that became popular in Chinese restaurants across the United States. The dish was inspired by the cooking styles of northern China and got its name from Mongolian barbecue restaurants where diners could select ingredients to be cooked on large, round, open grills.
Traditional Mongolian cooking rarely features the sweet component that we associate with the American version of Mongolian Beef. The version most of us know and love today is characterized by thin slices of beef that are typically stir-fried with scallions and other vegetables in a sweet and savory brown sauce.
Ingredients You’ll Need
For the Beef and Marinade:
- 1½ pounds flank steak (or sirloin)
- 3 tablespoons cornstarch
- 2 tablespoons low-sodium soy sauce
- 1 tablespoon rice wine (or dry sherry)
- 1 teaspoon baking soda (the secret to tenderizing!)
- ½ teaspoon freshly ground black pepper
For the Sauce:
- ⅓ cup low-sodium soy sauce
- ⅓ cup water
- ⅓ cup brown sugar (packed)
- 3 tablespoons honey
- 2 tablespoons rice vinegar
- 1 tablespoon sesame oil
- 1 tablespoon cornstarch (mixed with 2 tablespoons water)
- 1 tablespoon minced fresh ginger
- 4 cloves garlic, minced
- ½-1 teaspoon red pepper flakes (adjust to your heat preference)
For Stir-Frying:
- ⅓ cup vegetable oil (for frying)
- 6 green onions, cut into 2-inch pieces (whites and greens separated)
- 2 teaspoons sesame seeds (for garnish)
Equipment Needed
- Sharp knife for slicing beef
- Large mixing bowl
- Small bowl for sauce mixture
- Wok or large skillet
- Wooden spoon or tongs
- Paper towels
- Serving platter
Preparation Tips
Selecting and Slicing the Beef
The key to amazing Mongolian Beef starts with properly sliced meat. Here’s how to do it right:
- Choose the right cut: Flank steak is traditional and works beautifully, but sirloin can also work well. Look for meat with some marbling but not excessive fat.
- Partial freezing technique: Place your beef in the freezer for 15-20 minutes before slicing. This firms up the meat just enough to make thin slicing much easier.
- Slice against the grain: This is crucial! Find the direction of the muscle fibers in your beef and cut perpendicular to them. This shortens the fibers and makes each bite tender rather than chewy.
- Aim for thin, uniform slices: Cut your beef into slices about ⅛ inch thick. Uniform thickness ensures even cooking.
The “Velveting” Secret
One of the secrets to restaurant-quality Mongolian Beef is a technique called “velveting” – a Chinese cooking method that keeps meat incredibly tender and juicy during the high-heat cooking process. My version includes:
- Baking soda in the marinade acts as a tenderizer by breaking down proteins
- Cornstarch creates a protective coating
- The brief marinade infuses flavor while beginning the tenderizing process
Step-by-Step Instructions
Step 1: Prepare and Marinate the Beef
- Slice your partially frozen beef against the grain into thin strips, about ⅛-inch thick and 2-3 inches long.
- In a medium bowl, combine the sliced beef with cornstarch, soy sauce, rice wine, baking soda, and black pepper.
- Mix thoroughly to ensure each piece is well coated.
- Let the beef marinate for at least 20 minutes at room temperature (or up to 1 hour in the refrigerator).
Step 2: Prepare the Sauce
- In a bowl, whisk together soy sauce, water, brown sugar, honey, rice vinegar, sesame oil, cornstarch slurry, minced ginger, minced garlic, and red pepper flakes.
- Make sure the sugar is fully dissolved and ingredients are well combined.
- Set aside until ready to use.
Step 3: Cook the Beef
- Heat a wok or large skillet over high heat until it’s very hot.
- Add vegetable oil and heat until it’s shimmering but not smoking.
- Working in 2-3 batches to avoid overcrowding (which would steam rather than sear the meat), add the marinated beef strips in a single layer.
- Let the beef sear for 1 minute without stirring.
- Flip the pieces and cook for another 30-45 seconds until the edges are caramelized and crispy.
- Transfer to a paper towel-lined plate.
- Repeat with remaining beef, adding a little more oil if needed.
Step 4: Finish the Dish
- Pour out all but 1 tablespoon of oil from the wok.
- Add the white parts of the green onions and stir-fry for 30 seconds.
- Pour in the sauce mixture and bring to a simmer.
- Let the sauce bubble and thicken for about 1-2 minutes, stirring constantly.
- When the sauce has thickened to a glossy consistency that coats the back of a spoon, return the beef to the wok.
- Add the green parts of the onions.
- Toss everything together for about 30 seconds to coat the beef evenly and warm it through.
- Remove from heat immediately to prevent overcooking the beef.

Step 5: Serve
- Transfer to a serving plate and sprinkle with sesame seeds.
- Serve immediately while hot and sizzling.
Texture and Flavor Profile
When done right, this Mongolian Beef hits all the perfect notes:
| Element | Characteristic | How It’s Achieved |
|---|---|---|
| Beef Exterior | Crispy, caramelized | High-heat searing, cornstarch coating |
| Beef Interior | Tender, juicy | Velveting technique, proper slicing |
| Sauce Consistency | Glossy, clinging | Proper cornstarch ratio, reduction |
| Flavor Balance | Sweet, savory, umami | Brown sugar, honey, soy sauce |
| Heat Level | Mild to medium | Adjustable red pepper flakes |
| Aromatic Notes | Ginger, garlic, onion | Fresh ingredients, proper cooking time |
| Finish | Nutty, toasty | Sesame oil and seeds |
Common Mistakes to Avoid
- Slicing the beef too thick: This makes it chewy rather than tender.
- Overcrowding the pan: This leads to steaming instead of searing, giving you soggy beef instead of crispy.
- Overcooking the beef: Once it’s returned to the sauce, it only needs to be heated through, not cooked further.
- Under-reducing the sauce: Patience is key to getting that perfect clingy consistency.
- Using low-quality soy sauce: The sauce is central to this dish, so use a good-quality low-sodium soy sauce.
Serving Suggestions
Mongolian Beef is traditionally served with steamed rice, which provides the perfect neutral canvas for the flavorful beef and sauce. Here are some serving options:
- Classic: White jasmine rice and steamed broccoli
- Low-carb: Cauliflower rice or zucchini noodles
- Complete meal: Add a side of steamed vegetables like broccoli, snap peas, or bok choy
- Family style: Serve in the center of the table with rice and several vegetable sides for a feast
- Bowl style: Serve over rice with sliced cucumbers and carrots for freshness
Make-Ahead and Storage Tips
Make-Ahead Options:
- Slice the beef and prepare the marinade up to a day ahead, but don’t combine until ready to cook
- Prepare the sauce up to 2 days ahead and store in the refrigerator
- Cut green onions and store in an airtight container in the refrigerator
Storage Guidelines:
- Refrigerate leftovers in an airtight container for up to 3 days
- When reheating, add a splash of water to loosen the sauce
- For best texture, reheat gently in a skillet rather than microwave
- Not recommended for freezing as the texture will suffer
Customizing Your Mongolian Beef
One of the best things about making this dish at home is that you can adjust it to your preferences:
| Adjustment | Suggestion |
|---|---|
| Lower Sugar | Reduce brown sugar to 3 tablespoons, honey to 1 tablespoon |
| Spicier Version | Double the red pepper flakes or add 1 minced fresh chili |
| More Vegetables | Add thinly sliced bell peppers, snow peas, or mushrooms |
| Gluten-Free | Use tamari instead of soy sauce |
| Less Salt | Reduce soy sauce and increase water proportionally |
| Saucier | Increase sauce ingredients by 50% |
| Citrus Note | Add 1 teaspoon of orange zest to the sauce |
Nutritional Information
| Nutrient | Amount per Serving |
|---|---|
| Calories | Approximately 380 |
| Protein | 29g |
| Carbohydrates | 21g |
| Sugar | 18g |
| Fat | 19g |
| Sodium | 780mg |
| Fiber | 1g |
*Based on 4 servings without rice
The Secret to Restaurant-Quality Results
After testing dozens of variations, I’ve found that these three elements make the biggest difference in creating restaurant-quality Mongolian Beef at home:
- The velveting technique: The combination of cornstarch and baking soda transforms the texture of the meat.
- Proper heat management: A screaming hot pan for the initial sear, followed by careful sauce reduction at a lower heat.
- Sauce consistency: Taking the time to reduce the sauce until it’s the perfect consistency – thick enough to cling to the beef but not gloppy.

Frequently Asked Questions
Q: Can I use a different cut of beef? A: Yes! While flank steak is traditional, you can also use sirloin, skirt steak, or flat iron steak. Just make sure to slice thinly against the grain.
Q: Why is my beef chewy even though I followed the recipe? A: The most common reasons are slicing with the grain instead of against it, slicing too thick, or cooking the beef too long after returning it to the sauce.
Q: Can I make this less sweet? A: Absolutely. The sweetness is adaptable – you can reduce the brown sugar and honey by up to half for a more savory version.
Q: How can I make this spicier? A: Add more red pepper flakes, include some fresh chili peppers, or add a teaspoon of chili oil at the end.
Q: Is there a way to make this ahead for a party? A: Yes! Cook the beef and make the sauce separately up to a day ahead. When ready to serve, reheat the sauce, then add the beef just long enough to warm through.
Q: My sauce isn’t thickening. What went wrong? A: Make sure your cornstarch slurry is well mixed before adding it to the hot liquid, and give it enough time to bubble and thicken. If needed, you can make a little more slurry and add it gradually.
Q: Can I make this in an Instant Pot or slow cooker? A: This recipe is best made quickly in a wok or skillet. Pressure cookers and slow cookers would create a different texture and lose the characteristic crispy exterior.
Why This Recipe Works
The combination of techniques in this recipe ensures success:
- The velveting process creates super tender beef
- High-heat cooking develops deep flavor through caramelization
- Balanced sauce ingredients create the perfect flavor profile
- Proper sauce reduction ensures ideal consistency
- Quick cooking time prevents the beef from becoming tough
I’ve been making this recipe for years, and it never fails to impress. It’s become my go-to when I’m craving Chinese food but don’t want to order takeout. The beauty of mastering this dish is that once you understand the techniques, you can apply them to other stir-fries as well.
The next time you’re considering ordering Chinese takeout, give this recipe a try instead. I think you’ll be amazed at how delicious homemade Mongolian Beef can be when you have the right technique and ingredients. It might take a couple of tries to perfect, but once you do, this dish will likely become a regular in your cooking rotation.
Happy cooking!