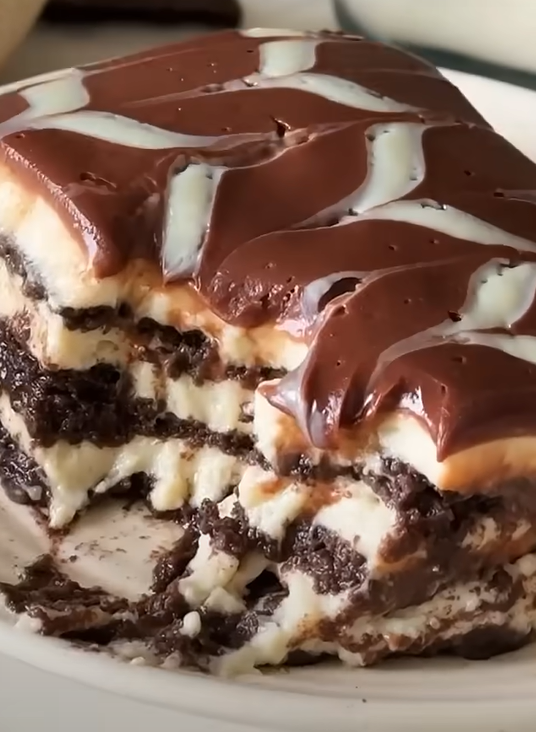
When I first stumbled upon the concept of brookies, I thought it was just another trendy dessert mashup. Boy, was I wrong! Red velvet brookies have completely transformed my understanding of what a dessert can be. This incredible fusion combines the fudgy richness of brownies with the chewy texture of cookies, all wrapped up in that signature red velvet flavor that makes hearts skip a beat.
The magic happens when you layer cookie dough beneath brownie batter, creating distinct yet harmonious layers that bake into one spectacular treat. I’ve been perfecting this recipe for months, and I’m thrilled to share every secret I’ve learned along the way.
What Exactly Are Red Velvet Brookies?
Let me break down this delightful dessert for you:
Brookies : A hybrid dessert that combines brownie batter with cookie dough, typically baked in layers to create a dual-textured treat
Red Velvet : A classic cake flavor characterized by its distinctive red color, subtle chocolate taste, and tangy cream cheese pairing
Red Velvet Brookies : The ultimate fusion dessert featuring red velvet cookie dough as the base layer and red velvet brownie batter on top, creating a rich, colorful, and texturally diverse treat
Cocoa Content : The amount of cocoa powder that gives red velvet its subtle chocolate flavor without overpowering the other elements
Food Coloring : Natural or artificial coloring agents that create the signature deep red hue associated with red velvet desserts
The Science Behind Perfect Red Velvet Brookies
Understanding the chemistry behind this dessert has been crucial to my success. The cookie layer needs enough structure to support the brownie layer while maintaining its chewy texture. Meanwhile, the brownie layer must be fudgy enough to contrast with the cookie base without being too wet.
The key lies in the fat-to-flour ratios and baking temperature. I’ve discovered that using room temperature ingredients and proper mixing techniques makes all the difference in achieving those perfect layers.
Essential Ingredients for Red Velvet Brookies
Here’s what you’ll need to create these show-stopping treats:
For the Red Velvet Cookie Layer:
- 2¼ cups all-purpose flour
- 1 teaspoon baking soda
- 1 teaspoon salt
- 2 tablespoons unsweetened cocoa powder
- 1 cup (2 sticks) unsalted butter, softened
- ¾ cup granulated sugar
- ¾ cup packed brown sugar
- 2 large eggs
- 2 teaspoons vanilla extract
- 1 tablespoon red food coloring
- 1 teaspoon white vinegar
For the Red Velvet Brownie Layer:
- 1 cup all-purpose flour
- ¼ cup unsweetened cocoa powder
- ½ teaspoon salt
- ½ cup (1 stick) unsalted butter
- 8 oz dark chocolate, chopped
- 1½ cups granulated sugar
- 3 large eggs
- 1 teaspoon vanilla extract
- 1 tablespoon red food coloring
- 1 teaspoon white vinegar
For the Cream Cheese Swirl:
- 8 oz cream cheese, softened
- ¼ cup granulated sugar
- 1 large egg yolk
- ½ teaspoon vanilla extract
Ingredient Quality and Substitutions
| Ingredient | Quality Tips | Possible Substitutions | Impact on Final Product |
|---|---|---|---|
| Cocoa Powder | Use Dutch-processed for deeper flavor | Natural cocoa powder | Dutch-processed creates richer color |
| Food Coloring | Gel coloring works best | Liquid food coloring | Gel won’t affect batter consistency |
| Butter | European-style for richness | Margarine (not recommended) | Butter provides superior flavor and texture |
| Dark Chocolate | 60-70% cocoa content | Semi-sweet chocolate chips | Higher cocoa content = more intense flavor |
| Cream Cheese | Full-fat for best texture | Neufchatel cheese | Lower fat content may affect swirl consistency |
| Vanilla Extract | Pure extract over imitation | Vanilla paste | Pure extract provides cleaner flavor |
Step-by-Step Instructions
Preparing Your Kitchen and Equipment
Before diving into the mixing process, I always ensure my kitchen is properly set up. Preheat your oven to 350°F (175°C) and line a 9×13-inch baking pan with parchment paper, leaving some overhang for easy removal.
Making the Red Velvet Cookie Dough
Start by whisking together the flour, baking soda, salt, and cocoa powder in a medium bowl. In a separate large bowl, cream the softened butter with both sugars until light and fluffy – this typically takes about 3-4 minutes with an electric mixer.
Beat in the eggs one at a time, followed by the vanilla extract, red food coloring, and white vinegar. The vinegar might seem unusual, but it reacts with the cocoa to enhance the red color naturally.
Gradually mix in the dry ingredients until just combined. Don’t overmix – this is crucial for maintaining the cookie’s chewy texture.
Creating the Red Velvet Brownie Batter

For the brownie layer, I start by melting the butter and chopped chocolate together using a double boiler method. This prevents the chocolate from seizing and creates a smooth base.
Once melted and slightly cooled, whisk in the sugar until combined. Add the eggs one at a time, beating well after each addition. Stir in the vanilla, red food coloring, and vinegar.
In a separate bowl, whisk together the flour, cocoa powder, and salt. Fold this dry mixture into the chocolate mixture until just combined.
Preparing the Cream Cheese Swirl
Beat the softened cream cheese until smooth and creamy. Add the sugar, egg yolk, and vanilla, mixing until well combined. This mixture should be smooth and easily spreadable.
Assembly and Baking Technique
Now comes the fun part – layering! Press the cookie dough evenly into the bottom of your prepared pan. I use my hands for this, slightly dampening them to prevent sticking.
Pour the brownie batter over the cookie layer, spreading it evenly with an offset spatula. Drop spoonfuls of the cream cheese mixture over the brownie batter, then use a knife to create swirl patterns.
Bake for 35-40 minutes, or until a toothpick inserted into the center comes out with just a few moist crumbs. The top should look set but still slightly soft.
Baking Temperature and Timing Guide
| Oven Type | Temperature | Baking Time | Visual Cues |
|---|---|---|---|
| Conventional | 350°F (175°C) | 35-40 minutes | Edges set, center slightly soft |
| Convection | 325°F (163°C) | 30-35 minutes | Even browning, no wet spots |
| High Altitude (3000+ ft) | 375°F (190°C) | 32-37 minutes | Faster rising, watch for overbaking |
Cooling and Storage
Patience is key when it comes to cooling brookies. Let them cool completely in the pan before cutting – this usually takes about 2 hours. I know it’s tempting to cut into them immediately, but trust me on this one.
For storage, I keep my brookies covered at room temperature for up to 5 days. They also freeze beautifully for up to 3 months when wrapped properly.
Flavor Variations and Creative Twists
Over the months, I’ve experimented with countless variations. Here are some of my favorites:
White Chocolate Red Velvet Brookies
Replace the dark chocolate in the brownie layer with white chocolate for a sweeter, more delicate flavor profile.
Red Velvet Brookies with Pecans
Fold ½ cup of chopped pecans into the cookie dough for added crunch and Southern flair.
Mint Red Velvet Brookies
Add ½ teaspoon of peppermint extract to the brownie batter for a refreshing twist.
Espresso Red Velvet Brookies
Dissolve 1 tablespoon of instant espresso powder in the melted chocolate mixture to enhance the chocolate flavor.
Troubleshooting Common Issues
Through my many attempts at perfecting this recipe, I’ve encountered several common problems:
Problem: Layers Don’t Stay Separate
Solution: Ensure your cookie dough is firm enough to support the brownie layer. If it’s too soft, chill it for 15 minutes before adding the brownie batter.
Problem: Brownie Layer Sinks Into Cookie Layer
Solution: Don’t overmix the brownie batter, and make sure your cookie dough is evenly distributed and properly pressed into the pan.
Problem: Dry or Crumbly Texture
Solution: Check your oven temperature with a thermometer – it might be running hot. Also, don’t overbake; the center should still look slightly underdone when you remove it from the oven.
Problem: Uneven Red Color
Solution: Mix the food coloring thoroughly into each layer separately, and consider using gel food coloring for more consistent results.
Nutritional Information
| Serving Size | Calories | Fat | Carbs | Protein | Fiber | Sugar |
|---|---|---|---|---|---|---|
| 1 piece (16 servings) | 385 | 18g | 54g | 5g | 2g | 42g |
| 1 piece (20 servings) | 308 | 14g | 43g | 4g | 1.6g | 34g |
| 1 piece (24 servings) | 257 | 12g | 36g | 3g | 1.3g | 28g |
Serving Suggestions and Presentation Ideas
Red velvet brookies are stunning on their own, but here are some ways I love to serve them:
Classic Presentation
Cut into neat squares and dust with powdered sugar for an elegant finish.
Ice Cream Parfait
Crumble brookies over vanilla ice cream and drizzle with chocolate sauce.
Brookie Trifle
Layer crumbled brookies with whipped cream and fresh berries in individual glasses.
Gift Packaging
Wrap individual squares in cellophane bags tied with red ribbon for perfect party favors.
Holiday Presentation
Use heart-shaped cookie cutters for Valentine’s Day or Christmas-themed cutters for holiday gatherings.
Advanced Techniques for Professional Results
Temperature Control
I always use an oven thermometer to ensure accuracy. Oven temperatures can vary significantly, and this dessert is sensitive to temperature fluctuations.
Ingredient Preparation
Bringing all ingredients to room temperature before mixing creates a more homogeneous batter and better texture in the final product.
Mixing Methods
I use the creaming method for the cookie layer to incorporate air and create structure, while the brownie layer uses the muffin method to maintain density.
Pan Preparation
Lining the pan with parchment paper and lightly greasing the sides ensures easy removal and clean cuts.
The Cultural History of Red Velvet
Red velvet has a fascinating history that I find absolutely captivating. Originally, the red color came from a natural reaction between cocoa and acidic ingredients. During the Great Depression, bakers began adding red food coloring to enhance the color, and the trend stuck.
The pairing of red velvet with cream cheese became popular in the 1960s, and it’s been a beloved combination ever since. By creating brookies with this classic flavor, we’re continuing a tradition of innovation while honoring time-tested taste preferences.
Seasonal Adaptations
Valentine’s Day Special
Add pink and red heart-shaped sprinkles to the cream cheese swirl for a romantic touch.
Christmas Version
Incorporate a hint of cinnamon into the cookie dough and top with white chocolate drizzle.
Summer Variation
Reduce the cocoa slightly and add fresh strawberry pieces to the cookie layer.
Fall Twist
Add a touch of warm spices like nutmeg and allspice to complement the cocoa.
Pairing Suggestions
These brookies pair beautifully with various beverages and accompaniments:
Hot Beverages
- Rich coffee or espresso
- Hot chocolate with marshmallows
- Chai tea latte
- Black tea with cream
Cold Beverages
- Cold milk (classic choice)
- Iced coffee
- Strawberry milk
- Vanilla milkshake
Dessert Accompaniments
- Vanilla ice cream
- Whipped cream
- Fresh berries
- Chocolate sauce
Professional Tips from My Kitchen
After countless batches, here are my insider secrets:
- Weigh your ingredients – Baking is science, and precision matters
- Room temperature ingredients mix better – Plan ahead and take everything out 2 hours before baking
- Don’t skip the vinegar – It’s essential for the authentic red velvet flavor
- Use parchment paper – It makes removal so much easier
- Cool completely before cutting – I cannot stress this enough!
Common Mistakes to Avoid
Overmixing the Batters
This leads to tough, dense brookies instead of the tender texture we’re after.
Incorrect Oven Temperature
Too hot, and the outside burns before the inside cooks; too cool, and you’ll have dry, overcooked brookies.
Skipping the Cooling Time
Cutting warm brookies results in a messy, crumbly disaster.
Using Cold Ingredients
Cold butter and eggs don’t incorporate well, leading to lumpy batters and uneven textures.
Q&A Section
Q. Can I make red velvet brookies ahead of time for a party? Absolutely! I actually think they taste better after sitting for a day. The flavors meld together beautifully, and the texture becomes even more perfect. You can make them up to 3 days in advance if stored properly.
Q. What’s the best way to cut clean squares? I use a sharp knife wiped clean between cuts, and I make sure the brookies are completely cool. Some people like to chill them for 30 minutes before cutting for even cleaner lines.
Q. Can I freeze the batter instead of baking it right away? Yes! I often prepare the cookie dough layer, wrap it tightly, and freeze it for up to 3 months. When ready to bake, I thaw it slightly, add the brownie layer, and bake as directed, adding a few extra minutes to the baking time.
Q. Why do my brookies sometimes turn out too dry? This usually happens from overbaking or using too much flour. I always measure flour by spooning it into the measuring cup and leveling it off, never scooping directly from the bag.
Q. Can I use natural food coloring instead of artificial? Definitely! Beet juice powder or natural red food coloring works well, though you might need to use more to achieve the same vibrant color. The taste won’t be affected.
Q. What should I do if my cream cheese swirl sinks to the bottom? This typically happens when the cream cheese mixture is too thin or the brownie batter is too thick. Make sure your cream cheese is at room temperature and properly beaten before adding other ingredients.
Q. How do I know when the brookies are perfectly done? The top should look set but still slightly soft in the center. A toothpick inserted in the center should come out with just a few moist crumbs – not wet batter, but not completely clean either.
Q. Can I make these gluten-free? Yes! I’ve had success substituting the all-purpose flour with a good quality gluten-free flour blend. Make sure it contains xanthan gum for the best texture.
Q. What’s the best way to store leftover brookies? I store them covered at room temperature for up to 5 days. For longer storage, I wrap individual pieces in plastic wrap and freeze them for up to 3 months.
Q. Can I double this recipe for a larger crowd? Absolutely! I often double the recipe and use two 9×13 pans or one large sheet pan. Just keep an eye on the baking time as it might need adjustment.
Q. Why do my brookies sometimes have a bitter aftertaste? This usually comes from using too much cocoa powder or using natural cocoa powder instead of Dutch-processed. Also, make sure your baking soda is fresh – old baking soda can leave a metallic taste.
Q. Can I add mix-ins like chocolate chips or nuts? Of course! I love adding white chocolate chips to the cookie layer or chopped pecans to the brownie layer. Just fold them in gently at the end to avoid overmixing.
Red velvet brookies have become my signature dessert, and I hope this comprehensive guide helps you create your own perfect batch. The combination of textures and flavors never fails to impress, whether I’m serving them at a casual family dinner or an elegant dinner party. Remember, baking is as much about the love you put into it as the technique, so enjoy the process and don’t be afraid to make this recipe your own!