Have you ever bitten into a warm, golden-brown bun only to discover a heavenly curry filling that melts in your mouth? If not, you’re missing out on one of Japan’s most cherished comfort foods: curry buns, or “kare pan” as they’re known in Japanese. I’ve been making these delicious treats for years, and I’m thrilled to share my comprehensive guide to creating these flavor bombs in your own kitchen.
What Are Japanese Curry Buns?
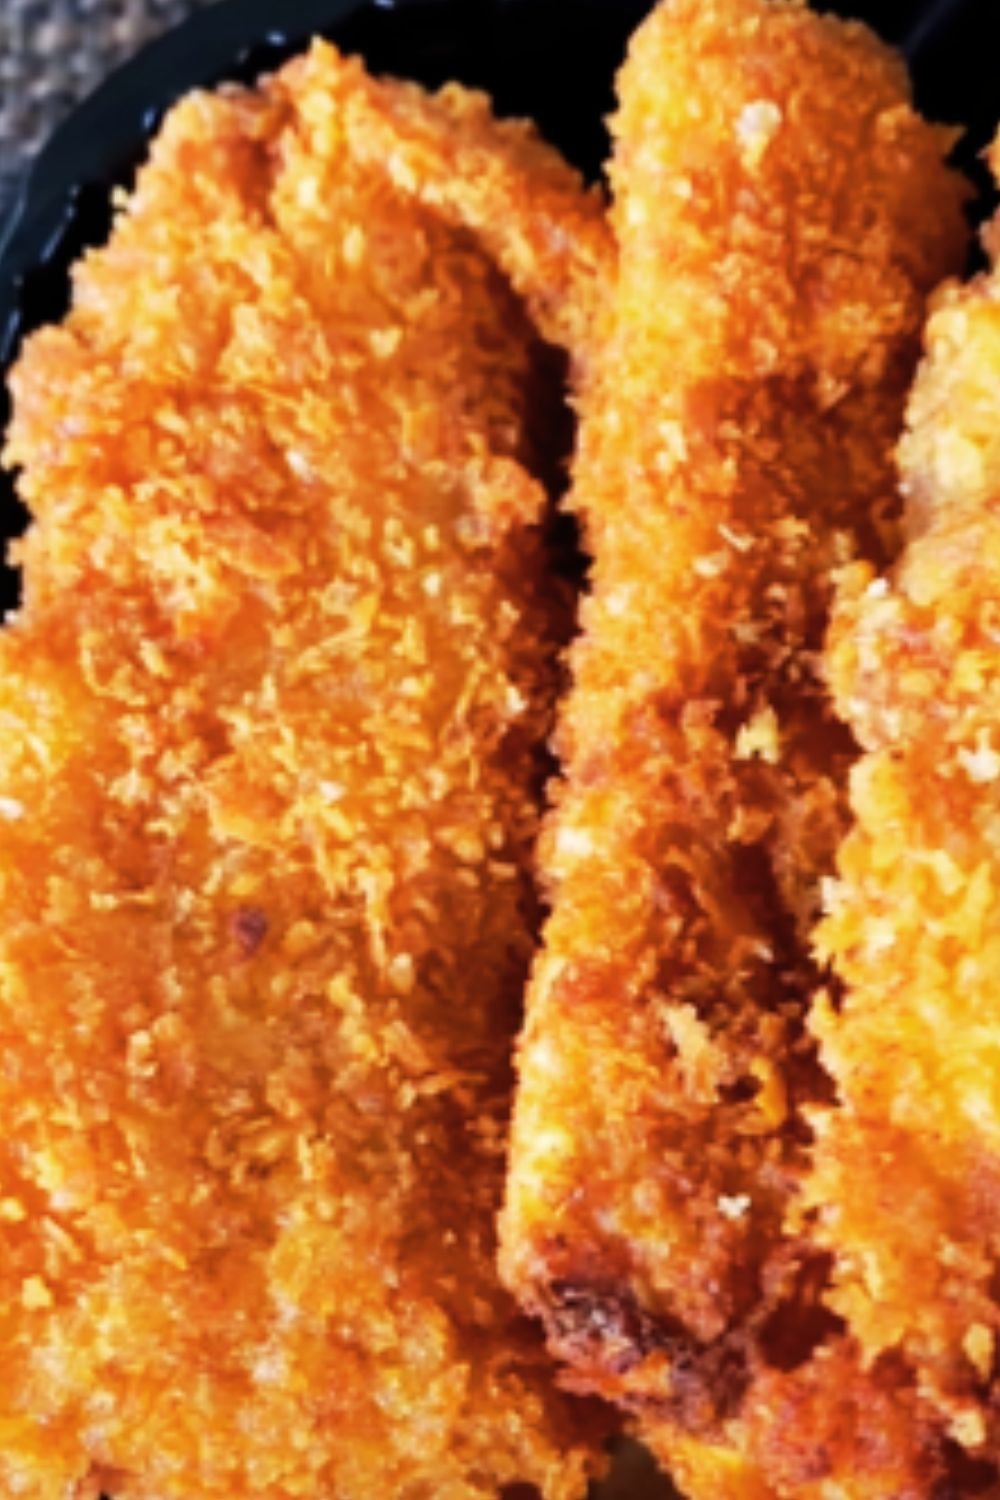
Japanese curry buns are deep-fried bread rolls filled with thick, savory curry. The contrast between the crispy exterior and the rich, flavorful filling creates a taste sensation that’s simply irresistible. As someone who lived in Japan for several years, I can attest that these buns are beloved staples at bakeries, convenience stores, and home kitchens across the country.
What makes these buns special isn’t just their incredible taste—it’s the fusion of culinary traditions they represent. They blend Western bread-making techniques with Japanese curry, which itself is an adaptation of Indian curry that came to Japan via British naval officers in the late 19th century. This cultural mashup results in something uniquely Japanese and utterly delicious.
The History Behind the Bun
The story of Japanese curry buns begins in the 1920s when a baker named Toyoo Takaoka reportedly created the first kare pan. As a child growing up in a Japanese household, I learned that Takaoka was inspired to find a way to make curry portable for workers’ lunches. His solution—encasing curry in bread dough and deep-frying it—was ingenious.
By the 1950s, curry buns had become wildly popular throughout Japan, and today they’re considered a national comfort food. I remember my grandmother telling me how she used to line up at bakeries after school just to get fresh curry buns while they were still warm.
Essential Ingredients for Authentic Curry Buns
Before diving into the recipe, let’s talk about what makes a truly authentic curry bun. Having made countless batches over the years, I can tell you that quality ingredients make all the difference.
For the Curry Filling:
- Japanese Curry Roux: This is non-negotiable for authentic flavor. Japanese curry is different from Indian or Thai curries—it’s thicker, sweeter, and less spicy. You can find curry roux blocks in most Asian grocery stores or online.
- Vegetables: Traditionally, carrots, onions, and potatoes are used, all diced very small.
- Protein: Ground beef or pork is standard, though chicken works well too.
- Grated Apple: My secret ingredient! This adds natural sweetness and helps tenderize the meat.
For the Dough:
- Bread Flour: Higher protein content creates a chewier texture.
- Milk: For richness and tenderness.
- Eggs: Adds structure and color.
- Sugar: Just a touch for flavor balance.
- Yeast: For that beautiful rise.
- Panko Breadcrumbs: These create the distinctive crunchy exterior.
Step-by-Step Recipe for Perfect Japanese Curry Buns

Curry Filling
I always recommend making the filling a day ahead. This allows the flavors to meld and the mixture to cool completely before using.
Ingredients:
- 1 tablespoon oil
- 1 medium onion, finely diced
- 2 garlic cloves, minced
- 1 small carrot, finely diced
- 1 small potato, finely diced
- 300g (10.5 oz) ground beef or pork
- 1/2 small apple, grated
- 2 tablespoons ketchup
- 1/2 tablespoon Worcestershire sauce
- 1/2 tablespoon soy sauce
- 3 tablespoons Japanese curry roux (about 2 blocks)
- 200ml (about 3/4 cup) water
- Salt and pepper to taste
Instructions:
- Heat oil in a pan over medium heat. Add onions and sauté until translucent, about 3-4 minutes.
- Add garlic and cook for another 30 seconds until fragrant.
- Add ground meat and break it up with a wooden spoon. Cook until browned.
- Add diced carrots and potatoes, cooking for about 2 minutes.
- Mix in grated apple, ketchup, Worcestershire sauce, and soy sauce.
- Pour in water, bring to a simmer, then reduce heat to low.
- Break curry roux blocks into pieces and add to the mixture, stirring until completely dissolved.
- Simmer on low heat for about 10-15 minutes until the sauce thickens significantly. The filling should be very thick—much thicker than regular curry.
- Taste and adjust seasoning with salt and pepper.
- Transfer to a container and refrigerate until completely cool, preferably overnight.
Bread Dough
Ingredients:
- 300g (2.5 cups) bread flour
- 3 tablespoons sugar
- 1 teaspoon salt
- 1 tablespoon dry active yeast
- 1 egg
- 150ml (about 2/3 cup) warm milk
- 30g (2 tablespoons) unsalted butter, softened
For Coating:
- 1 egg, beaten (egg wash)
- 1.5 cups panko breadcrumbs
- Oil for deep frying
Instructions:
- In a large bowl, combine flour, sugar, and salt.
- In a separate small bowl, dissolve yeast in warm milk (about 110°F/43°C) and let it sit for 5 minutes until foamy.
- Add the yeast mixture and egg to the flour mixture.
- Mix until the dough comes together, then add the softened butter.
- Knead the dough on a floured surface for about 10 minutes until smooth and elastic. When I first started making these, I underestimated how important proper kneading is—don’t skimp on this step!
- Place the dough in a greased bowl, cover with plastic wrap, and let rise in a warm place for about 1 hour or until doubled in size.
- Punch down the dough and divide it into 8-10 equal pieces, forming each into a ball.
- Let the dough balls rest, covered with a damp cloth, for 15 minutes.
Assembly and Cooking
- Take one dough ball and flatten it into a disk about 4-5 inches (10-12cm) in diameter, making the edges slightly thinner than the center.
- Place about 1.5 tablespoons of the curry filling in the center.
- Carefully bring the edges of the dough up and pinch firmly to seal completely. This is crucial—any openings will cause the filling to leak during frying.
- Place the sealed side down and gently shape into a slightly oval form.
- Repeat with remaining dough and filling.
- Brush each bun with egg wash, then coat thoroughly with panko breadcrumbs.
- Let the assembled buns rest for 20 minutes.
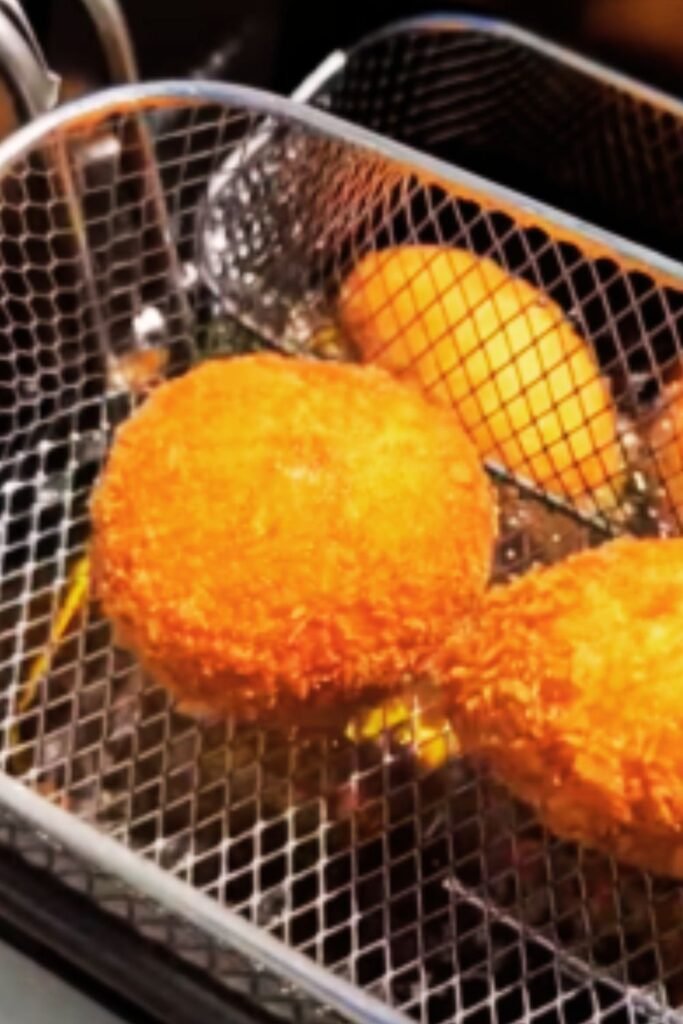
- Heat oil in a deep fryer or deep pot to 340°F (170°C).
- Fry the buns in batches, about 2-3 minutes per side, until golden brown. Don’t overcrowd the pot!
- Drain on paper towels and cool slightly before serving.
Common Mistakes and How to Avoid Them
In my years of making curry buns, I’ve encountered just about every possible pitfall. Here are the most common mistakes and how to avoid them:
Filling Issues:
- Too Wet Filling: The curry filling must be very thick, almost paste-like. If it’s too thin, it will leak during frying.
- Filling Too Hot: Never use warm filling! It will start to proof the dough unevenly and make sealing difficult.
- Using Regular Curry: Regular Japanese curry is too thin. You must reduce it significantly or use less water in your recipe.
Dough Problems:
- Poor Sealing: The most common issue! Pinch the seams firmly and check for any openings.
- Overproofing: Don’t let the filled buns sit too long before frying, or they may become too airy and burst during cooking.
- Oil Temperature: Too hot, and the outside burns before the inside cooks; too cool, and the buns absorb excess oil and become greasy.
Variations to Try
After mastering the basic curry bun, I started experimenting with these delicious variations:
Cheese Curry Buns
Add a small cube of mozzarella or cheddar to the center of the curry filling before sealing. The melted cheese adds an incredible gooey texture that pairs beautifully with the curry.
Baked Curry Buns
For a healthier option, brush with egg wash and bake at 375°F (190°C) for about 15-18 minutes until golden brown. The texture is different—less crispy but still delicious.
Curry Pan Sandwich
Cut a curry bun in half and add fresh lettuce and tomato for a unique sandwich experience. I discovered this variation at a local bakery and was amazed at how well the fresh vegetables complement the rich curry.
Nutrition Information
For those watching their nutrition intake, here’s the approximate nutritional breakdown for one standard curry bun:
| Nutrient | Amount |
|---|---|
| Calories | 320-380 |
| Protein | 10g |
| Carbohydrates | 45g |
| Fat | 14g |
| Fiber | 2g |
| Sodium | 450mg |
Note that these values can vary based on your specific ingredients and portion sizes. Baked versions will have significantly less fat—approximately 7-8g per bun.
Storage and Reheating Tips

One of the things I love about curry buns is that they store beautifully. Here’s how I handle leftovers:
Short-Term Storage:
- Room Temperature: Freshly fried buns can be kept at room temperature for up to 6 hours. Perfect for packing in lunches!
- Refrigerator: Store in an airtight container for up to 3 days.
Long-Term Storage:
- Freezing Unbaked: You can freeze assembled but unfried buns for up to 1 month. Freeze them individually on a baking sheet first, then transfer to freezer bags.
- Freezing Cooked: Fried buns freeze well for up to 2 months. Wrap individually in plastic wrap, then place in freezer bags.
Reheating:
- From Refrigerated: Microwave for 30 seconds, then crisp in a toaster oven for 2-3 minutes.
- From Frozen (Cooked): Thaw in the refrigerator overnight, then reheat as above. Alternatively, reheat frozen buns in a 350°F (175°C) oven for about 15 minutes.
- From Frozen (Uncooked): Thaw in the refrigerator overnight, then proceed with the frying instructions.
Serving Suggestions
My favorite way to enjoy curry buns is simply while they’re still warm from frying, when the contrast between the crispy exterior and steamy interior is at its peak. However, here are some lovely serving suggestions:
- Serve with a side of fukujinzuke (Japanese pickled vegetables) for a tangy contrast.
- Pair with a light miso soup for a more substantial lunch.
- For a party presentation, cut buns in half and serve on a platter with decorative toothpicks.
- Complement with iced green tea or barley tea (mugicha) for an authentic Japanese experience.
- For kids’ lunches, wrap in wax paper and include a small container of ketchup for dipping.
Adapting to Dietary Restrictions
Over the years, I’ve had many friends ask for modified versions of this recipe to accommodate their dietary needs. Here are some successful adaptations I’ve developed:
Vegetarian Curry Buns:
Replace the meat with an equal amount of finely diced mushrooms or crumbled firm tofu. Add 1 teaspoon of miso paste to boost the umami flavor.
Gluten-Free Option:
Use a cup-for-cup gluten-free flour blend with 1 teaspoon of xanthan gum added. For the coating, crush gluten-free rice cereal instead of panko. Note that the texture will be slightly different, but still delicious.
Lower-Fat Version:
Bake instead of fry, and use lean ground turkey or chicken for the filling. You can also reduce the butter in the dough to 20g with minimal impact on flavor.
Cultural Context and Serving Occasions
In Japan, curry buns hold a special place in food culture. They’re not just delicious—they represent a specific type of comfort food that spans generations. Here’s when they’re typically enjoyed:
- Bento Boxes: Many Japanese parents include mini curry buns in their children’s school lunches.
- Train Station Snacks: Major train stations often have bakeries selling warm curry buns to commuters.
- Sports Games: They’re popular stadium food at baseball games and other sporting events.
- Home Parties: Homemade curry buns are often served as part of casual gatherings.
During my time living in Tokyo, I noticed that curry buns appeared most frequently during the cooler seasons—they’re particularly popular in autumn and winter when their warming qualities are most appreciated.
Troubleshooting Guide
Despite your best efforts, things can sometimes go wrong. Here’s how to troubleshoot common curry bun problems:
Problem: Filling leaks during frying
Solution: Make sure your filling is cold and thick. Double-check all seams and consider using less filling per bun.
Problem: Dough is too sticky to work with
Solution: Chill the dough for 30 minutes before dividing and rolling. Use as little additional flour as possible when handling.
Problem: Buns are doughy in the center
Solution: Lower your oil temperature slightly and increase frying time. If the outside is browning too quickly, your oil is too hot.
Problem: Panko coating falls off during frying
Solution: Make sure the egg wash covers the entire surface, and gently press the panko into the dough. Let the breaded buns sit for a few minutes before frying.
Problem: Buns absorb too much oil
Solution: Check that your oil is hot enough (340°F/170°C) before adding the buns. Don’t overcrowd the frying vessel, as this can lower the temperature too much.
Questions & Answers
Q: Can I make the curry filling spicier? Yes! Japanese curry is typically mild, but you can add chili flakes, cayenne pepper, or use hot curry roux instead of medium. I sometimes add a teaspoon of gochujang (Korean chili paste) for a different kind of heat.
Q: Why did my bread turn out dense instead of fluffy? The most common causes are insufficient kneading, not giving the dough enough time to rise, or using old yeast. Make sure your yeast is active (it should foam when mixed with warm milk) and that you knead until the dough passes the “window pane test”—you should be able to stretch a small piece thin enough to see light through it without tearing.
Q: Can I air-fry these instead of deep-frying? Absolutely! Preheat your air fryer to 375°F (190°C), spray the buns lightly with oil, and cook for 12-15 minutes until golden brown. The texture will be slightly different but still delicious.
Q: How do I know when the buns are done frying? They should be a deep golden brown color, and if you insert a thermometer into the center, it should read at least 190°F (88°C). The buns will also float to the surface of the oil when they’re done.
Q: Can I use store-bought bread dough? Yes, in a pinch you can use store-bought bread dough or even frozen dinner roll dough. Let it thaw and come to room temperature before using. The flavor won’t be quite the same, but it’s a great time-saver.
Q: How far in advance can I prepare these for a party? You can make the curry filling up to three days ahead and store it in the refrigerator. The assembled, unfried buns can be prepared the morning of your event and kept refrigerated. For best results, fry them within two hours of serving.
Final Thoughts
Mastering Japanese curry buns takes practice, but the results are well worth the effort. There’s something deeply satisfying about creating these little pockets of flavor from scratch—from the moment the spicy aroma fills your kitchen to the delightful crunch of that first bite.
What I love most about curry buns is how they connect me to Japanese food culture and history. Every time I make them, I think about how this simple fusion food has become a beloved staple across Japan.
Whether you’re an experienced baker or trying your hand at Japanese cooking for the first time, I hope this guide helps you create curry buns that would make any Japanese baker proud. Remember that perfection comes with practice, so don’t be discouraged if your first batch isn’t picture-perfect. The journey—and the delicious results along the way—is what cooking is all about.
Now go preheat that oil, and happy baking!