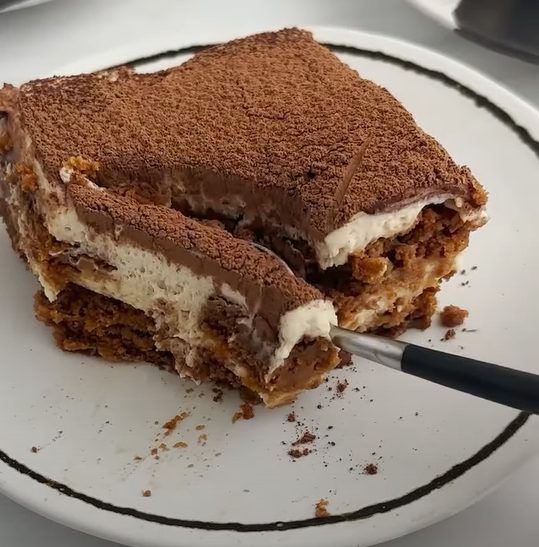
I’ve always been fascinated by the way traditional Italian desserts can be transformed with modern twists, and my Easy Biscoff Tiramisu is a perfect example of this culinary evolution. This delightful fusion combines the beloved coffee-soaked layers of classic tiramisu with the irresistible caramelized cookie flavor of Biscoff spread and cookies.
What makes this recipe particularly special is how it maintains the essence of traditional tiramisu while introducing the warm, spiced notes of Biscoff cookies. I discovered this combination during a particularly busy week when I was craving something indulgent but didn’t have ladyfingers on hand. The result was so spectacular that it’s now become my go-to dessert for entertaining guests and satisfying my own sweet tooth.
The beauty of this dessert lies in its accessibility. Unlike traditional tiramisu that requires specific ingredients like ladyfingers and mascarpone, my Biscoff version uses readily available ingredients that you can find in most grocery stores. The preparation process is straightforward, making it perfect for both novice bakers and experienced dessert enthusiasts.
Understanding the Components
Biscoff Elements
: Biscoff Cookies – Originally known as Speculoos, these Belgian cookies provide the foundation with their distinctive cinnamon and caramel notes : Biscoff Spread – A smooth, creamy butter made from the cookies themselves, adding intense flavor and richness : Biscoff Crumbs – Crushed cookies that create textural contrast and visual appeal
Coffee Components
: Strong Coffee – The backbone that provides the classic tiramisu flavor profile : Coffee Liqueur – Optional but recommended for depth and authenticity : Espresso Powder – Concentrated coffee flavor that intensifies the overall taste
Cream Components
: Mascarpone Cheese – The traditional Italian cream cheese that creates the signature tiramisu texture : Heavy Cream – Whipped to create lightness and volume : Cream Cheese – An alternative or supplement that adds stability and tang
Essential Ingredients Breakdown
| Ingredient | Quantity | Purpose | Substitution Options |
|---|---|---|---|
| Biscoff Cookies | 24-30 pieces | Base layer structure | Graham crackers, digestive biscuits |
| Biscoff Spread | 1/2 cup | Flavor enhancement | Speculoos spread, cookie butter |
| Mascarpone | 16 oz | Creamy base | Cream cheese + heavy cream |
| Heavy Cream | 2 cups | Whipped topping | Whipping cream |
| Strong Coffee | 2 cups | Soaking liquid | Espresso, cold brew |
| Sugar | 3/4 cup | Sweetening agent | Powdered sugar, maple syrup |
| Eggs | 4 large | Traditional base | Pasteurized eggs |
| Coffee Liqueur | 1/4 cup | Flavor depth | Rum, brandy, or omit |
Equipment Requirements
| Equipment | Size/Type | Essential Level | Alternative |
|---|---|---|---|
| Mixing Bowls | Large (3-4 quart) | Essential | Any large bowl |
| Electric Mixer | Stand or hand | Recommended | Whisk (manual) |
| Baking Dish | 9×13 inch | Essential | Individual glasses |
| Fine Mesh Sieve | Standard | Recommended | Clean kitchen towel |
| Measuring Cups | Complete set | Essential | Kitchen scale |
| Rubber Spatula | Flexible | Essential | Large spoon |
Step-by-Step Preparation
Phase 1: Coffee Preparation
I always start by preparing the coffee mixture because it needs time to cool completely. Brew your coffee extra strong – about double the normal concentration. This intensity is crucial because the cookies will absorb much of the liquid, and you want that coffee flavor to remain prominent.
Add the coffee liqueur while the coffee is still warm, allowing the alcohol to integrate properly. If you’re omitting alcohol, consider adding a teaspoon of vanilla extract for complexity. Let this mixture cool to room temperature, then refrigerate for at least 30 minutes.
Phase 2: Cream Mixture Creation
The cream mixture is where the magic happens. I begin by bringing eggs to room temperature, which is essential for proper incorporation. In my experience, cold eggs can cause the mixture to seize or become lumpy.
Separate your eggs carefully, ensuring no yolk gets into the whites. Beat the yolks with sugar until they become pale and ribbony – this usually takes about 5-7 minutes with an electric mixer. The mixture should fall in thick ribbons when you lift the beaters.
Gradually fold in the mascarpone cheese, ensuring it’s at room temperature to prevent lumps. I always use a gentle folding motion rather than aggressive mixing to maintain the light texture. Add the Biscoff spread during this stage, mixing until just combined.
Phase 3: Whipped Cream Integration
In a separate bowl, whip the heavy cream to soft peaks. I prefer soft peaks over stiff peaks because they fold more easily into the mascarpone mixture without deflating. Over-whipped cream can make the final texture grainy.
Gently fold the whipped cream into the mascarpone mixture in three additions. This gradual incorporation helps maintain the airy texture that makes tiramisu so special.
Phase 4: Assembly Process
Now comes the fun part – assembly. I use a systematic approach that ensures even distribution and proper soaking.
Quickly dip each Biscoff cookie into the coffee mixture. The key word here is “quickly” – about 2-3 seconds per side. Over-soaking will cause the cookies to fall apart, while under-soaking won’t provide enough coffee flavor.
Create your first layer by arranging the soaked cookies in a single layer in your baking dish. I typically use a 9×13 inch dish, but individual serving glasses work beautifully too and make for elegant presentation.
Spread half of the cream mixture over the first layer of cookies, using an offset spatula to create smooth, even coverage. The cream should completely cover the cookies without any gaps.
Repeat the process with the remaining cookies and cream mixture. For the final touch, I crush additional Biscoff cookies and sprinkle them over the top layer for extra texture and visual appeal.
Flavor Enhancement Techniques
Biscoff Spread Integration
I’ve discovered that warming the Biscoff spread slightly makes it easier to incorporate into the cream mixture. Simply microwave it for 10-15 seconds until it becomes more fluid. This prevents lumps and ensures even distribution throughout the dessert.
Coffee Intensity Adjustment
The coffee component can be customized based on your preference. I typically use a 2:1 ratio of coffee to coffee liqueur, but you can adjust this based on your taste preferences. For a stronger coffee flavor, add a tablespoon of instant espresso powder to your coffee mixture.
Texture Variations
For added texture, I sometimes fold in crushed Biscoff cookies into the cream mixture itself. This creates delightful surprises of crunch throughout each bite while maintaining the smooth, creamy base.
Chilling and Setting Guidelines
| Time Frame | Texture Development | Flavor Integration |
|---|---|---|
| 2 hours | Basic setting | Minimal integration |
| 4 hours | Good consistency | Moderate blending |
| 6 hours | Optimal texture | Good flavor melding |
| 8+ hours | Perfect setting | Full flavor development |
| 24 hours | Peak texture | Maximum flavor integration |
Patience is crucial with tiramisu. I always recommend chilling for at least 6 hours, but overnight is ideal. During this time, the cookies soften to the perfect texture while the flavors meld beautifully. The cream sets to a mousse-like consistency that holds its shape when served.
Serving and Presentation
Portion Guidelines
I typically cut my 9×13 inch tiramisu into 12-15 generous servings. The richness of this dessert means a little goes a long way. Each serving should showcase the beautiful layers you’ve created.
Garnishing Options
Just before serving, I dust the top with cocoa powder using a fine-mesh sieve. This not only adds visual appeal but also provides a slight bitter contrast to the sweet Biscoff flavors. Additional crushed Biscoff cookies make an excellent garnish, and a light drizzle of melted Biscoff spread creates an elegant finish.
Temperature Considerations
Serve your Biscoff tiramisu chilled but not frozen. Remove it from the refrigerator about 10-15 minutes before serving to allow it to come to the ideal temperature. This slight warming enhances the flavors and makes the texture more enjoyable.
Storage and Shelf Life
| Storage Method | Duration | Quality Notes |
|---|---|---|
| Refrigerated (covered) | 3-4 days | Peak quality first 2 days |
| Refrigerated (uncovered) | 1-2 days | Surface may dry out |
| Frozen | Not recommended | Texture deteriorates |
| Individual portions | 3-4 days | Better portion control |
Proper storage is essential for maintaining the quality of your tiramisu. I always cover the dish tightly with plastic wrap, ensuring the wrap touches the surface to prevent a skin from forming. Glass containers work better than metal for storage as they don’t impart any flavors.
Troubleshooting Common Issues
Lumpy Cream Mixture
If your cream mixture becomes lumpy, it’s usually due to temperature differences between ingredients. I strain the mixture through a fine-mesh sieve to remove lumps, then gently re-whip to restore smoothness.
Soggy Cookies
Over-soaked cookies are a common issue. If this happens, you can still salvage the dessert by adding an extra layer of crushed cookies between layers to absorb excess moisture.
Separated Cream
If your cream separates during whipping, it’s likely over-whipped. I add a tablespoon of cold cream and gently fold it in to restore the proper consistency.
Nutritional Considerations
| Nutrient | Per Serving (1/12 of recipe) | Daily Value % |
|---|---|---|
| Calories | 485 | 24% |
| Fat | 32g | 49% |
| Saturated Fat | 18g | 90% |
| Carbohydrates | 45g | 15% |
| Sugar | 38g | – |
| Protein | 8g | 16% |
| Sodium | 245mg | 11% |
While this dessert is certainly indulgent, it also provides calcium from the dairy components and some protein from the eggs. I consider it a special occasion treat rather than an everyday dessert.
Variations and Adaptations
Individual Serving Portions
Creating individual portions in glasses or small bowls makes for elegant presentation and easier portion control. I use the same layering technique but scale down the quantities accordingly.
Gluten-Free Version
Substitute the Biscoff cookies with gluten-free gingersnap cookies or make your own using almond flour. The flavor profile remains similar while accommodating dietary restrictions.
Dairy-Free Adaptations
While challenging, you can create a dairy-free version using cashew cream instead of mascarpone and coconut cream instead of heavy cream. The texture will be different but still delicious.
Advanced Tips for Perfect Results
Temperature Control
All ingredients should be at room temperature when you begin mixing. This ensures smooth incorporation and prevents lumps or separation. I typically remove ingredients from the refrigerator 1-2 hours before starting.
Mixing Techniques
Use a folding motion rather than stirring when combining ingredients. This gentle technique preserves the air bubbles that create the light, fluffy texture characteristic of great tiramisu.
Quality Ingredients
Invest in good-quality mascarpone and fresh eggs. The quality of these primary ingredients significantly impacts the final result. I always taste my mascarpone before using it to ensure it’s fresh and creamy.
Seasonal Variations
Holiday Adaptations
During holidays, I sometimes add a pinch of cinnamon or nutmeg to enhance the warm spice notes of the Biscoff cookies. A light dusting of these spices on top creates a festive appearance.
Summer Modifications
In warmer weather, I add an extra hour to the chilling time to ensure the dessert sets properly. The cream can be more sensitive to temperature fluctuations during hot weather.
Pairing Suggestions
Beverage Pairings
This rich dessert pairs beautifully with strong coffee or espresso. The bitter notes complement the sweet Biscoff flavors perfectly. For non-coffee drinkers, black tea or even hot chocolate works well.
Complementary Desserts
If serving as part of a dessert spread, pair with lighter options like fresh fruit or sorbet to provide contrast in richness and flavor intensity.
Questions & Answers
Q: Can I make this tiramisu without eggs? I understand the concern about raw eggs in traditional tiramisu. You can create an eggless version by increasing the mascarpone to 24 oz and adding 2 tablespoons of powdered sugar for stability. The texture will be denser but still delicious.
Q: How far in advance can I prepare this dessert? I recommend making this tiramisu 1-2 days ahead of serving. The flavors actually improve with time, and the texture becomes more cohesive. However, don’t add the final garnishes until just before serving to maintain their appearance.
Q: What if I can’t find Biscoff cookies in my area? Speculoos cookies are essentially the same thing with a different brand name. If neither is available, gingersnap cookies or even graham crackers can work as substitutes, though the flavor will be different.
Q: Can I reduce the sugar content in this recipe? The sugar serves multiple purposes beyond sweetening – it helps stabilize the cream and balances the coffee’s bitterness. I wouldn’t reduce it by more than 25% without affecting the texture and overall balance.
Q: Why did my tiramisu turn out runny? A runny tiramisu usually results from under-whipped cream, over-soaked cookies, or insufficient chilling time. Ensure your cream reaches soft peaks and allow adequate setting time in the refrigerator.
Q: Can I freeze leftover tiramisu? I don’t recommend freezing tiramisu as the texture changes significantly. The cream can separate and become grainy when thawed. It’s better to reduce the recipe size or share with friends and family.
Q: How do I prevent the cocoa powder from clumping when dusting? Use a fine-mesh sieve and tap it gently rather than shaking vigorously. Also, ensure the tiramisu surface is completely dry before dusting, as any moisture will cause clumping.
Q: Can I use instant coffee instead of brewed coffee? While freshly brewed coffee provides the best flavor, you can use instant coffee in a pinch. Use about 3-4 tablespoons of instant coffee dissolved in 2 cups of hot water for the proper strength.
Q: What’s the best way to cut clean slices? Use a sharp knife dipped in warm water and wiped clean between cuts. This prevents the cream from sticking to the blade and creates clean, professional-looking slices.
Q: Can I add fresh fruit to this recipe? While not traditional, thin slices of banana or pear between layers can add freshness and complement the Biscoff flavors. Avoid overly juicy fruits that might make the dessert soggy.