When I first stumbled upon the magic combination of chocolate pudding and Oreo cookies, I knew I had discovered something extraordinary. This Chocolate Oreo Pudding Delight has become my go-to dessert for family gatherings, potluck dinners, and those moments when I need to impress without spending hours in the kitchen. The beauty of this dessert lies in its simplicity – layers of rich chocolate pudding, crushed Oreo cookies, and fluffy whipped cream create a symphony of textures and flavors that never fails to wow my guests.
What makes this dessert truly special is its versatility. I’ve served it at children’s birthday parties where it disappeared within minutes, and I’ve also presented it at elegant dinner parties where it earned rave reviews. The contrast between the smooth, creamy pudding and the crunchy cookie crumbs creates an irresistible texture that keeps everyone coming back for more.
Understanding the Components
Chocolate Pudding Base : The foundation of our dessert, this rich and creamy pudding provides the primary chocolate flavor. I prefer using a combination of instant pudding mix enhanced with additional cocoa powder for depth.
Oreo Cookie Layer : These iconic sandwich cookies add texture and intensify the chocolate experience. The key is achieving the right balance between fine crumbs and slightly larger pieces.
Whipped Cream Topping : Light and airy, this component balances the richness of the chocolate and adds visual appeal. I always use heavy whipping cream for the best results.
Optional Enhancements : Additional elements like chocolate shavings, extra cookie pieces, or even a drizzle of chocolate sauce can elevate the presentation.
Essential Ingredients Breakdown
Creating the perfect Chocolate Oreo Pudding Delight requires careful attention to ingredient quality and proportions. Here’s my detailed ingredient analysis:
| Ingredient | Quantity | Purpose | Quality Tips |
|---|---|---|---|
| Instant Chocolate Pudding Mix | 2 packages (3.4 oz each) | Primary pudding base | Choose name-brand for consistency |
| Cold Milk | 4 cups | Pudding liquid base | Whole milk creates richest texture |
| Oreo Cookies | 36 cookies (1 package) | Texture and flavor contrast | Original flavor works best |
| Heavy Whipping Cream | 2 cups | Light, airy topping | Must be cold for proper whipping |
| Powdered Sugar | 1/3 cup | Sweetens whipped cream | Sift to prevent lumps |
| Vanilla Extract | 2 teaspoons | Enhances overall flavor | Pure vanilla recommended |
| Unsweetened Cocoa Powder | 2 tablespoons | Intensifies chocolate flavor | Dutch-processed preferred |
| Cream Cheese | 8 oz (optional) | Adds richness to pudding | Room temperature for smooth mixing |
Step-by-Step Preparation Method
Preparing the Chocolate Pudding
My technique for creating the most luxurious chocolate pudding involves a few secret steps that transform ordinary instant pudding into something extraordinary. First, I always chill my mixing bowl and whisk in the freezer for about 15 minutes before starting. This ensures the pudding sets properly and maintains its smooth texture.
I begin by whisking the instant pudding mix with the additional cocoa powder in my chilled bowl. This extra cocoa powder is my secret weapon – it deepens the chocolate flavor significantly. Then, I add the cold milk gradually, whisking constantly to prevent any lumps from forming. The key is to whisk vigorously for exactly two minutes, no more, no less. This timing is crucial for achieving the perfect consistency.
If I’m using cream cheese to enhance the richness, I beat it separately until smooth and gradually incorporate it into the pudding mixture. This creates an incredibly creamy texture that rivals any bakery-quality dessert.
Creating the Perfect Oreo Layer
The Oreo preparation is where many people go wrong, but I’ve perfected the technique over years of experimentation. I separate the cookies into two groups – about two-thirds will be crushed into various sizes, while the remaining third will be reserved for decoration.
For crushing, I place the cookies in a large zip-lock bag and use a rolling pin to create a mixture of fine crumbs and chunky pieces. The variety in texture is essential – the fine crumbs integrate beautifully with the pudding, while the larger pieces provide delightful surprise bursts of crunch.
Whipping the Perfect Cream
Achieving the ideal whipped cream requires patience and attention to detail. I start with a completely clean bowl and beaters – any residue can prevent proper whipping. The heavy cream must be cold, straight from the refrigerator.
I begin whipping at medium speed, gradually increasing to high as the cream begins to thicken. When soft peaks form, I slowly add the powdered sugar and vanilla extract. The goal is stiff peaks that hold their shape but aren’t over-whipped into butter.
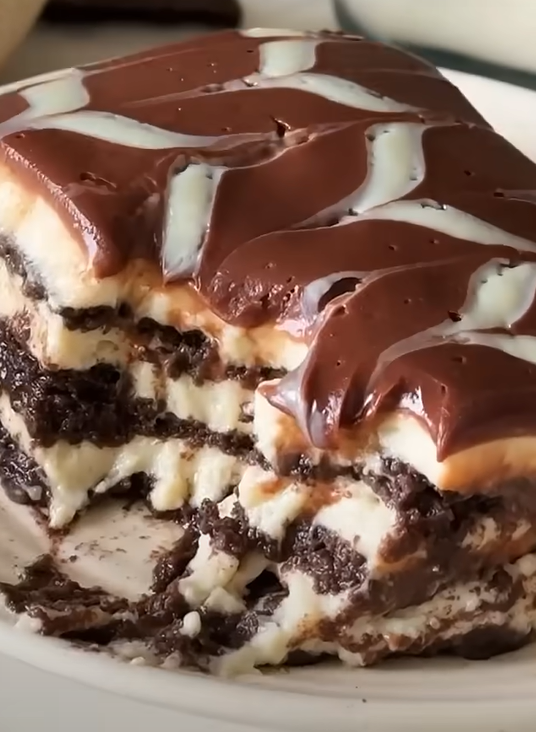
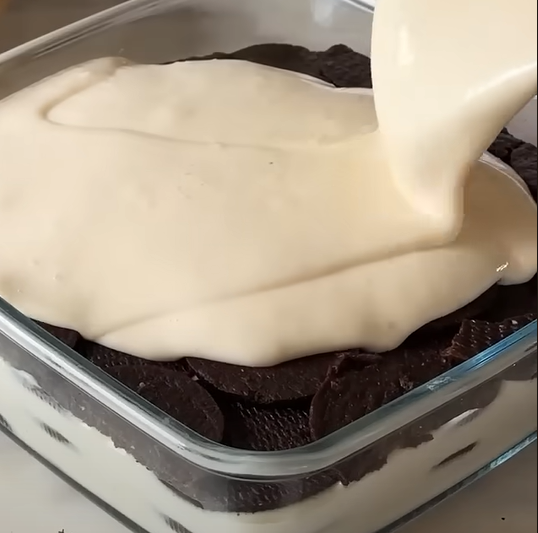
Assembly Techniques for Maximum Impact
The layering process is where this dessert transforms from simple ingredients into a show-stopping presentation. I always use a clear glass bowl or individual parfait glasses to showcase the beautiful layers.
Layer Distribution Strategy
| Layer Order | Ingredient | Thickness | Visual Impact |
|---|---|---|---|
| Bottom | Oreo crumbs | 1/2 inch | Dark foundation |
| Second | Chocolate pudding | 1 inch | Rich brown layer |
| Third | Oreo crumbs | 1/4 inch | Textural contrast |
| Fourth | Chocolate pudding | 1 inch | Primary filling |
| Fifth | Oreo crumbs | 1/4 inch | Visual separation |
| Top | Whipped cream | 1/2 inch | Light, airy finish |
| Garnish | Reserved Oreos | As needed | Final decoration |
I start with a generous layer of crushed Oreos at the bottom, pressing them gently to create a stable base. The first layer of pudding goes on next, spread carefully to avoid disturbing the cookie layer. I continue alternating between pudding and cookies, finishing with a flourish of whipped cream and whole or halved Oreos for decoration.
Nutritional Analysis and Dietary Considerations
Understanding the nutritional profile of this dessert helps in planning balanced meals and accommodating different dietary needs. Here’s my comprehensive breakdown:
| Nutritional Component | Per Serving (1/12 of recipe) | Daily Value % | Notes |
|---|---|---|---|
| Calories | 385 | 19% | Moderate for dessert portion |
| Total Fat | 18g | 28% | Primarily from cream and cookies |
| Saturated Fat | 11g | 55% | High due to dairy content |
| Carbohydrates | 52g | 17% | Sugar and flour from cookies/pudding |
| Sugar | 38g | – | Natural and added sugars |
| Protein | 6g | 12% | From milk and cream |
| Calcium | 185mg | 18% | Significant from dairy |
| Iron | 2.1mg | 12% | From cocoa and fortified ingredients |
Dietary Modifications I’ve Successfully Tested
Over the years, I’ve adapted this recipe for various dietary needs without sacrificing flavor or texture. For those watching their sugar intake, I’ve successfully used sugar-free pudding mix and reduced the powdered sugar in the whipped cream by half. The result is still deliciously sweet thanks to the Oreo cookies.
For guests with dairy sensitivities, I’ve experimented with coconut milk for the pudding and coconut whipped cream. While the flavor profile changes slightly, it remains incredibly satisfying. I’ve also created a lighter version using sugar-free pudding, light whipped topping, and reduced-fat cookies, cutting calories by approximately 30%.
Serving Suggestions and Presentation Ideas
The presentation of this dessert can range from casual family-style to elegant individual portions. For large gatherings, I prefer using a clear glass trifle bowl that showcases all the beautiful layers. The visual impact is stunning, and guests can see exactly what deliciousness awaits them.
Individual Presentation Options
When entertaining smaller groups or for special occasions, I create individual servings in various containers:
- Mason jars for a rustic, charming appearance
- Elegant glass parfait cups for formal dinners
- Clear plastic cups for outdoor events or children’s parties
- Wine glasses for an upscale presentation
Garnishing Techniques
My favorite garnishing approaches include:
- Whole Oreo cookies perched artfully on the whipped cream
- Chocolate shavings made with a vegetable peeler and dark chocolate bar
- A light dusting of cocoa powder for sophisticated finish
- Mini chocolate chips scattered across the top
- Fresh berries for color contrast and added freshness
Storage and Make-Ahead Strategies
One of the greatest advantages of this dessert is its make-ahead friendly nature. I often prepare it the night before a dinner party, allowing the flavors to meld beautifully. The cookies soften slightly but maintain enough texture to provide that satisfying crunch.
Optimal Storage Conditions
| Storage Method | Duration | Quality Notes | Best Use |
|---|---|---|---|
| Refrigerated (covered) | 3-4 days | Peak quality first 48 hours | Regular storage |
| Individual portions | 5 days | Maintains better texture | Meal prep |
| Freezer storage | 1 month | Texture changes slightly | Long-term storage |
| Room temperature | 2 hours max | Food safety concern | Serving only |
For the best results, I cover the dessert tightly with plastic wrap, ensuring the wrap touches the surface to prevent a skin from forming on the pudding. If I’m making individual portions, I use containers with tight-fitting lids.
Troubleshooting Common Issues
Through years of making this dessert, I’ve encountered and solved various challenges that home cooks often face:
Pudding Consistency Problems
If the pudding doesn’t set properly, it’s usually due to insufficient whisking or using milk that wasn’t cold enough. I always keep a backup box of pudding mix on hand, just in case. When the pudding is too thin, I whisk in an additional half packet of pudding mix with a small amount of cold milk.
Whipped Cream Disasters
Over-whipped cream is a common mistake, but it’s preventable. I stop whipping the moment stiff peaks form. If I accidentally over-whip, I gently fold in a tablespoon of liquid cream to restore smoothness.
Cookie Texture Issues
Sometimes the cookies become too soggy, especially if the dessert sits too long. To prevent this, I reserve some cookies to add fresh texture just before serving. I also ensure the pudding is completely set before assembly.
Seasonal Variations and Creative Adaptations
This basic recipe serves as an excellent foundation for seasonal variations that keep the dessert exciting year-round. During autumn, I incorporate pumpkin spice Oreos and add a hint of cinnamon to the whipped cream. Winter calls for peppermint Oreos with a touch of mint extract in the pudding.
Holiday Transformations
For Christmas, I use red and green food coloring to create festive layers, alternating between traditional chocolate pudding and mint-flavored versions. Halloween gets the full treatment with orange-colored pudding layers and crushed orange Oreos.
International Flavor Inspirations
I’ve experimented with various international flavor profiles:
- Mexican chocolate version with cinnamon and cayenne
- Italian tiramisu-inspired variation with coffee-soaked cookies
- French-inspired version with lavender-infused cream
- German Black Forest interpretation with cherry layers
Advanced Techniques for Experienced Bakers
For those wanting to elevate this dessert further, I’ve developed several advanced techniques that create professional-quality results:
Homemade Pudding Enhancement
While instant pudding is convenient, making homemade chocolate pudding creates an even more luxurious experience. I combine egg yolks, sugar, cornstarch, milk, and high-quality chocolate for a custard-like consistency that’s absolutely divine.
Textural Innovations
I sometimes incorporate additional textures like crushed chocolate wafer cookies, brownie pieces, or even chocolate cake crumbs. These additions create complex layers of flavor and texture that surprise and delight guests.
Professional Plating Techniques
For special occasions, I pipe the whipped cream using various tips to create elegant designs. Star tips create beautiful rosettes, while round tips allow for precise dots and lines. I also use squeeze bottles for the pudding to create clean, precise layers.
Questions and Answers
Q: Can I make this dessert without instant pudding mix? Yes, absolutely! I often make homemade chocolate pudding using eggs, milk, sugar, cornstarch, and cocoa powder. It requires more time and attention but creates an incredibly rich, custard-like texture that’s worth the extra effort. The key is cooking it slowly and stirring constantly to prevent lumps.
Q: How far in advance can I prepare this dessert? I recommend preparing it at least 4 hours ahead, but it’s actually best when made the day before serving. This allows all the flavors to meld together beautifully. The cookies soften slightly but still maintain a pleasant texture. I wouldn’t recommend making it more than 3 days in advance as the quality begins to decline.
Q: What’s the best way to crush Oreo cookies for optimal texture? My preferred method involves placing the cookies in a large zip-lock bag and using a rolling pin to create a mixture of fine crumbs and chunky pieces. I aim for about 60% fine crumbs and 40% larger pieces. This combination provides both integration with the pudding and exciting texture bursts. Avoid using a food processor as it creates too uniform a texture.
Q: Can I substitute the heavy whipping cream with a lighter alternative? While heavy whipping cream produces the best results, I’ve successfully used whipped topping from a container as a substitute, though the texture is slightly different. For a lighter option, you can use whipped cream made from milk and gelatin, but it won’t hold its shape as well. Avoid using regular milk or half-and-half as they won’t whip properly.
Q: Why does my pudding sometimes turn out lumpy despite following the recipe? Lumpy pudding typically results from adding the milk too quickly or not whisking vigorously enough. I always add the milk gradually while whisking constantly, and I whisk for the full 2 minutes specified on the package. Using cold milk is crucial – if it’s too warm, the pudding won’t set properly and may become lumpy.
Q: How can I prevent the layers from mixing together during assembly? The key is ensuring each layer is properly set before adding the next one. I chill the pudding for at least 30 minutes before assembly, and I use a gentle spreading motion rather than pouring. When adding the whipped cream, I use a large spoon to dollop it on top and spread it carefully without pressing down.
Q: What are some creative variations I can try with this basic recipe? I love experimenting with different Oreo flavors – mint, peanut butter, and birthday cake varieties all work wonderfully. You can also add layers of fresh berries, caramel sauce, or even pieces of brownie. For adults, a splash of coffee liqueur in the pudding creates an elegant twist.
Q: Is there a way to make this dessert healthier without sacrificing taste? Absolutely! I often use sugar-free pudding mix, reduced-fat milk, and light whipped topping to cut calories significantly. You can also substitute some of the Oreos with chocolate graham crackers or use reduced-fat cookies. Adding fresh berries not only improves nutrition but also adds natural sweetness and beautiful color.
Q: How do I know when my whipped cream is perfectly whipped? Perfect whipped cream holds stiff peaks when you lift the beaters – the peaks should stand straight up without drooping. Under-whipped cream will be too loose and won’t hold its shape in the dessert, while over-whipped cream becomes grainy and can turn into butter. I stop the mixer frequently to check the consistency.
Q: Can this dessert be frozen for longer storage? While it can be frozen for up to a month, the texture changes considerably. The whipped cream becomes icy and the pudding may separate slightly upon thawing. If you do freeze it, thaw it slowly in the refrigerator and consider refreshing the top with fresh whipped cream before serving.
Q: What’s the secret to achieving perfectly distinct layers? The secret lies in proper chilling and gentle handling. I chill each component separately before assembly, and I use the back of a spoon to spread each layer carefully. Building the dessert in a clear container helps me see what I’m doing, and I work slowly to maintain clean lines between layers.
Q: How can I make individual portions look as impressive as a large trifle? Individual portions can be just as stunning! I use clear containers like mason jars or parfait glasses, and I pay extra attention to the visual balance of each layer. I often reserve the most perfect cookie pieces for garnishing individual servings, and I pipe the whipped cream for a more professional appearance.
This Chocolate Oreo Pudding Delight has become more than just a recipe in my kitchen – it’s a reliable crowd-pleaser that never fails to bring smiles to faces around my table. The combination of rich chocolate, creamy textures, and satisfying crunch creates a dessert experience that appeals to both children and adults. Whether you’re preparing for a casual family dinner or an elegant dinner party, this versatile dessert adapts beautifully to any occasion while maintaining its irresistible charm.