There’s something magical about the aroma of garlic bread wafting through the kitchen. That buttery, garlicky scent instantly triggers hunger pangs and creates an atmosphere of comfort. As someone who’s been perfecting quick recipes for busy weeknights, I’ve spent years refining my garlic bread technique, and I’m thrilled to share my foolproof 15-minute version with you today.
This isn’t just any garlic bread recipe—it’s the perfect balance of rich butter, aromatic garlic, fresh herbs, and the ideal bread texture. Whether you’re serving it alongside pasta, soup, or enjoying it as a standalone snack, this quick garlic bread will become your new go-to recipe.
Why This 15-Minute Garlic Bread Is a Game-Changer
Before diving into the recipe, let me tell you why this particular approach stands out:
- Truly Quick: From start to finish in just 15 minutes—perfect for busy weeknights
- Customizable: Easy to adapt based on what you have in your pantry
- Foolproof Method: Achieves that perfect balance of crispy exterior and soft interior
- Make-Ahead Option: Can be prepped earlier and baked when needed
- Freezer-Friendly: Excellent for batch preparation
I’ve made garlic bread hundreds of times over the years, and what I’ve learned is that simplicity often produces the best results. This recipe focuses on quality ingredients, proper technique, and efficient preparation—all while keeping the authentic flavors that make garlic bread so beloved.
Ingredients: Simple But Crucial
The beauty of great garlic bread lies in its simplicity. Here’s what you’ll need:
| Ingredient | Quantity | Notes |
|---|---|---|
| French baguette or Italian bread | 1 loaf (about 16 inches) | Day-old bread works exceptionally well |
| Unsalted butter | 1/2 cup (113g) | Softened at room temperature |
| Fresh garlic | 4-6 cloves | Minced finely (adjust according to preference) |
| Fresh parsley | 2 tablespoons | Finely chopped |
| Parmesan cheese | 1/4 cup | Freshly grated (optional but recommended) |
| Salt | 1/4 teaspoon | Fine sea salt works best |
| Black pepper | 1/8 teaspoon | Freshly ground |
| Italian seasoning | 1/2 teaspoon | Or a mix of dried oregano, basil, and thyme |
| Extra virgin olive oil | 1 tablespoon | For added flavor and moisture |
| Paprika | 1/4 teaspoon | For color and subtle flavor (optional) |
Bread Selection: The Foundation of Great Garlic Bread
The bread you choose makes a significant difference. I’ve experimented with various types and have found these options work best:
- French Baguette: Creates a crispier exterior with a light, airy interior
- Italian Bread: Slightly softer with a more substantial crumb
- Ciabatta: Offers more nooks and crannies for the butter mixture to seep into
- Sourdough: Provides a tangy flavor contrast to the rich garlic butter
Day-old bread actually works better for this recipe as it has slightly less moisture, allowing it to absorb the garlic butter more effectively without becoming soggy.
Equipment Needed
One of the beauties of this recipe is its simplicity in terms of kitchen tools:
- Sharp bread knife
- Cutting board
- Small mixing bowl
- Pastry brush or butter knife
- Aluminum foil
- Baking sheet or tray
- Garlic press (optional but helpful)
Step-by-Step Preparation
Step 1: Prepare the Bread
Begin by preheating your oven to 375°F (190°C). This temperature creates the perfect balance of melting the butter without burning the bread.
Cut your baguette or Italian bread lengthwise, creating two equal halves. Place them cut-side up on a baking sheet lined with aluminum foil (this makes cleanup much easier!).
If your bread is particularly fresh and soft, you can place it cut-side up in the oven for about 2-3 minutes to slightly dry the surface. This creates the perfect canvas for your garlic butter and prevents sogginess.
Step 2: Create the Perfect Garlic Butter Mixture

In a small mixing bowl, combine the softened butter, minced garlic, chopped parsley, grated Parmesan (if using), salt, pepper, Italian seasoning, olive oil, and paprika.
Mix thoroughly until all ingredients are well incorporated. The texture should be smooth and spreadable—if your butter isn’t soft enough, you can microwave it for 5-10 seconds to soften (not melt) it.
Now, here’s my secret technique for maximum flavor: After mixing, let the garlic butter mixture rest for 5 minutes. This allows the butter to absorb the flavors of the herbs and garlic, creating a more aromatic spread.
Step 3: Apply the Garlic Butter
Using a pastry brush or butter knife, generously spread the garlic butter mixture onto the cut surfaces of the bread. Make sure to spread it all the way to the edges for consistent flavor in every bite.
For an extra indulgent version, you can double the amount of garlic butter and really pile it on. The butter will melt into the bread during baking, creating pockets of garlicky goodness.
Step 4: Bake to Perfection
There are two methods for baking, depending on your preference:
For Soft, Buttery Garlic Bread:
- Place the bread halves back together (like a sandwich)
- Wrap the entire loaf tightly in aluminum foil
- Bake for 10-12 minutes until heated through
For Crispy-Edged Garlic Bread:
- Place the bread halves cut-side up on the baking sheet
- Bake uncovered for 8-10 minutes until the edges start to turn golden
- Then, for additional crispiness, broil for 1-2 minutes (watching carefully to prevent burning)
I personally prefer the second method as it creates a wonderful textural contrast—crispy edges with a soft, buttery interior.
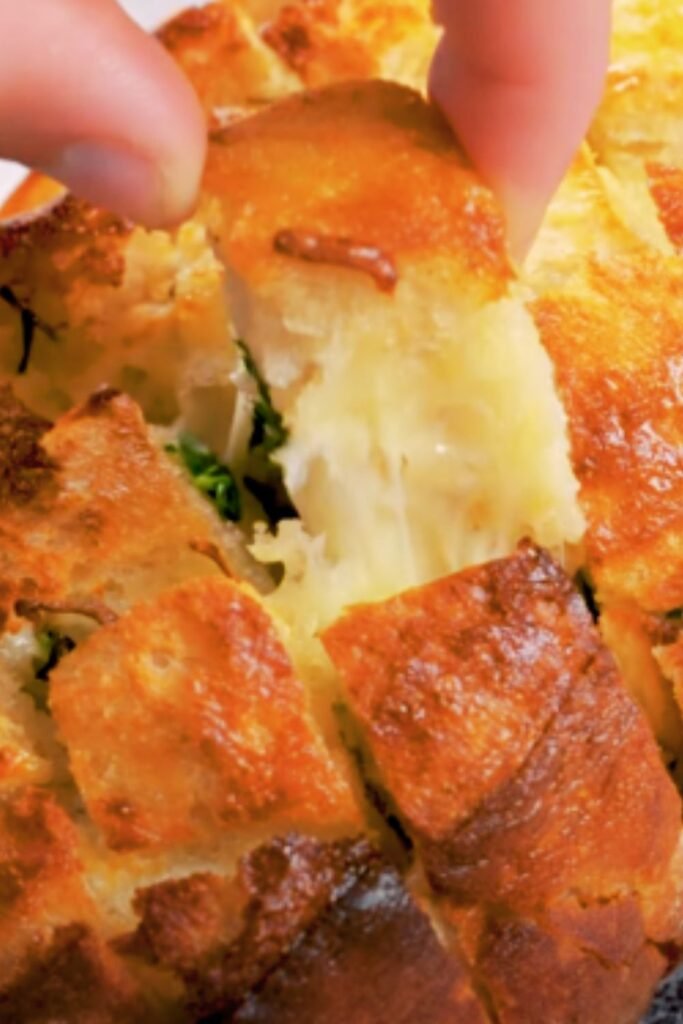
Step 5: Slice and Serve
Once baked, remove the bread from the oven and let it cool for just 1-2 minutes. Using a sharp bread knife, cut into 1-inch slices.
For presentation, I like to arrange the slices partially overlapping on a serving platter, perhaps with a small sprinkle of additional fresh parsley for color.
Serve immediately while hot and fragrant for the best experience.
Variations to Try
One of the things I love about this recipe is how adaptable it is. Here are some of my favorite variations:
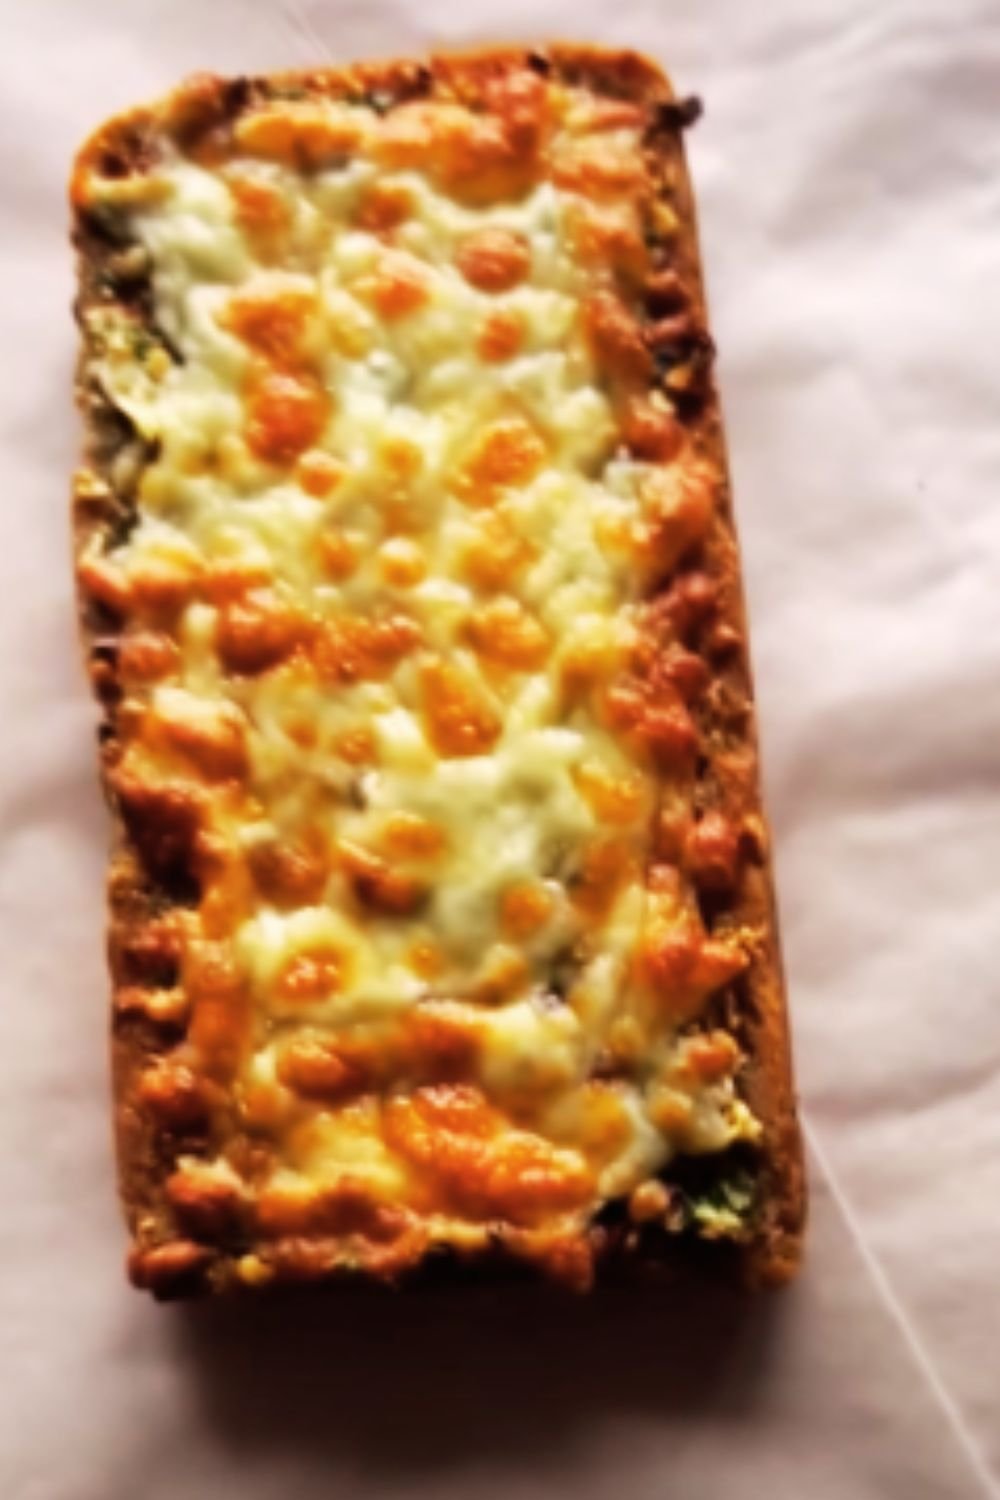
Cheesy Garlic Bread
Add 1 cup of shredded mozzarella over the top of the buttered bread before baking. After the initial baking time, switch to broil for 1-2 minutes until the cheese is bubbly and golden.
Spicy Garlic Bread
Add 1/4 teaspoon of red pepper flakes to the butter mixture for a pleasant heat that complements the garlic beautifully.
Herb-Loaded Version
Double all the herbs and add 1 tablespoon each of fresh basil and chives for an aromatic, garden-fresh twist.
Roasted Garlic Variation
Replace fresh garlic with 1 whole head of roasted garlic (mashed into a paste) for a sweeter, more mellow garlic flavor.
Mediterranean Style
Add 2 tablespoons of sun-dried tomatoes (finely chopped) and 1 tablespoon of capers to the butter mixture for a Mediterranean-inspired version.
Make-Ahead and Storage Tips
Make-Ahead Options:
I often prepare garlic bread in advance, especially when hosting dinner parties. Here’s how:
- Prepare the garlic butter mixture up to 3 days in advance and store in an airtight container in the refrigerator. Bring to room temperature before using.
- Spread the mixture on the bread up to 12 hours before baking. Wrap tightly in plastic wrap and refrigerate until ready to bake.
- For longer storage, prepare the entire garlic bread unbaked, wrap tightly in plastic wrap, then in aluminum foil, and freeze for up to 3 months.
Storage and Reheating:
Leftover garlic bread (if there is any!) can be stored and enjoyed later:
- Allow any leftovers to cool completely
- Wrap tightly in aluminum foil or place in an airtight container
- Store at room temperature for up to 2 days or refrigerate for up to 4 days
- To reheat: Place in a 350°F (175°C) oven for 5-7 minutes until warmed through
Troubleshooting Common Issues
Through years of making garlic bread, I’ve encountered various challenges. Here are solutions to common problems:
Problem: Soggy Garlic Bread
Solution: Make sure your bread isn’t too fresh (day-old is ideal), and consider pre-toasting the cut sides briefly before adding butter. Also, avoid overlapping bread slices until just before serving.
Problem: Burnt Edges, Cold Center
Solution: Lower your oven temperature to 350°F and bake for a few minutes longer. This allows for more even heating.
Problem: Garlic Tastes Too Raw
Solution: Sauté the minced garlic in 1 tablespoon of butter for 30 seconds before adding it to the butter mixture. This mellows the garlic flavor while maintaining its aroma.
Problem: Butter Doesn’t Spread Easily
Solution: Make sure your butter is properly softened. Leave it at room temperature for at least 30 minutes before mixing, or microwave in 5-second increments until spreadable but not melted.
Nutritional Information
I believe in transparency about what we eat. Here’s an approximate nutritional breakdown per serving (assuming 12 servings from one loaf):
| Nutrient | Amount per Serving |
|---|---|
| Calories | 165 |
| Total Fat | 9g |
| Saturated Fat | 5g |
| Cholesterol | 20mg |
| Sodium | 240mg |
| Total Carbohydrates | 18g |
| Dietary Fiber | 0.8g |
| Sugars | 0.5g |
| Protein | 3g |
Keep in mind that these values can vary based on the specific ingredients and bread used.
Perfect Pairings
Garlic bread is versatile and pairs wonderfully with many dishes. Here are some of my favorite serving suggestions:
- Pasta Dishes: The classic pairing—especially spaghetti with marinara or Bolognese sauce
- Soups: Particularly tomato soup, minestrone, or Italian wedding soup
- Salads: Turns a Caesar or Greek salad into a complete meal
- Grilled Meats: Complements grilled chicken, steak, or pork beautifully
- Roasted Vegetables: Makes a simple vegetable side feel more substantial
- On Its Own: Paired with a dish of good quality olive oil and balsamic vinegar for dipping
For a complete Italian-inspired meal, serve this garlic bread with a simple spaghetti marinara, a fresh green salad dressed with lemon and olive oil, and finish with a light dessert like berries and whipped cream.
Additional Preparation Tips
After making this recipe countless times, I’ve collected some helpful tips:
- Butter Temperature: The butter should be soft enough to easily mix with other ingredients but not melted. The ideal consistency is when you can press your finger into it and leave an indentation without the butter sticking to your finger.
- Garlic Preparation: For the best flavor distribution, mince the garlic as finely as possible or use a garlic press. Larger pieces can create uneven flavor “hot spots.”
- Even Distribution: When spreading the garlic butter, pay special attention to the edges of the bread, which can easily be missed but tend to dry out first during baking.
- Foil Technique: If using the wrapped method, make sure your foil seam is at the top of the bread, not underneath, to prevent butter from leaking out during baking.
- Slicing Timing: For the cleanest slices, wait 1-2 minutes after removing from the oven before cutting. This allows the butter to slightly set while the bread is still warm.
Frequently Asked Questions
Over the years, I’ve received many questions about garlic bread preparation. Here are the most common ones:
Q: Can I use salted butter instead of unsalted? Yes, you can use salted butter. If you do, reduce or eliminate the added salt in the recipe. I prefer unsalted butter because it gives better control over the final flavor.
Q: Is there a way to make this healthier? Absolutely! You can reduce the butter by half and substitute with olive oil. You can also use whole grain bread for additional fiber and nutrients.
Q: How do you get the garlic flavor without the harsh bite? If raw garlic is too strong for your taste, you can either roast the garlic first or sauté the minced garlic in a small amount of butter for 30-60 seconds before adding it to the butter mixture.
Q: Can I make this dairy-free? Yes! Use a high-quality plant-based butter substitute and skip the Parmesan cheese or use a dairy-free Parmesan alternative.
Q: How can I tell when the garlic bread is perfectly done? The bread should be warmed through with lightly golden edges. If you prefer softer bread, the crust should remain relatively light. For crispier bread, look for a more pronounced golden color around the edges.
Q: My family doesn’t like herbs. Can I make this without them? Certainly! The herbs are optional. A simple mixture of butter, garlic, salt, and a touch of olive oil still makes excellent garlic bread.
Q: Can I use garlic powder instead of fresh garlic? While fresh garlic provides the best flavor, you can substitute with garlic powder in a pinch. Use 1/2 teaspoon of garlic powder for each clove of fresh garlic called for in the recipe.
The History Behind Garlic Bread
While we typically associate garlic bread with Italian cuisine, its origins are somewhat debated. The concept of flavoring bread with garlic dates back centuries in Mediterranean cuisine, but the garlic bread we know today—with butter and often herbs—is actually an Italian-American creation that gained popularity in the mid-20th century.
Traditional Italian “bruschetta” involves toasting bread and rubbing it with raw garlic cloves and olive oil, a much simpler preparation than our buttery version. The evolution to the garlic bread we enjoy today reflects the abundance of butter in American cuisine and the adaptation of recipes by Italian immigrants.
I find that understanding the cultural context of a dish enhances the experience of both making and eating it. This 15-minute garlic bread may be quick to prepare, but it carries with it a rich history of culinary adaptation and innovation.
A Final Note on Quality Ingredients
While this recipe is quick and straightforward, the quality of your ingredients makes a significant difference in the final result:
- Butter: European-style butter with higher fat content creates a richer flavor
- Garlic: Fresh, firm garlic cloves without any green sprouts provide the cleanest flavor
- Bread: Artisanal bread from a local bakery often has better texture and flavor than mass-produced varieties
- Herbs: Fresh herbs offer brighter flavors than dried, though both work well
- Olive Oil: Even just a tablespoon of good extra virgin olive oil adds depth to the butter mixture
The beauty of this recipe is that even with basic ingredients, the result is still delicious. However, when you have access to higher-quality components, the garlic bread transforms from great to extraordinary.
I hope this 15-minute garlic bread recipe becomes a staple in your kitchen as it has in mine. There’s something deeply satisfying about creating something so flavorful in such a short time, and watching family and friends eagerly reach for second and third pieces.
Whether you’re making it for a weeknight family dinner or a special gathering, this garlic bread is sure to impress while keeping your cooking stress-free. Enjoy the process, the aroma, and most importantly, the delicious results!
Q&A Section
Q: Can I prepare the garlic butter mixture in advance? Yes! The garlic butter mixture can be prepared up to 3 days in advance and stored in an airtight container in the refrigerator. Just make sure to bring it to room temperature before spreading on the bread for easier application.
Q: My garlic bread always burns on the bottom. What am I doing wrong? This typically happens when the oven rack is positioned too low or the baking sheet is too thin. Try moving your oven rack to the middle position and using a heavy-duty baking sheet. If you don’t have a heavy baking sheet, try doubling up two regular sheets for more insulation.
Q: How can I make sure the garlic flavor infuses well without being too strong? The key is allowing the garlic butter mixture to rest for about 5 minutes after mixing and before spreading. This rest period allows the flavors to meld. If you’re still concerned about the garlic being too strong, you can sauté the minced garlic in a little butter for 30-60 seconds before adding it to the butter mixture, which will mellow the flavor.
Q: What’s the best way to serve garlic bread at a party when timing is tricky? For parties, I recommend preparing the garlic bread completely up to the baking stage. Keep it refrigerated, then bake it about 10 minutes before you want to serve it. If there’s a timing delay, you can keep the baked garlic bread warm by wrapping it loosely in foil and placing it in an oven set to the lowest temperature (usually around 170°F).
Q: Does garlic bread freeze well? Yes! Prepare the bread with the garlic butter spread, then freeze it unbaked. Wrap it tightly in plastic wrap, then in foil, and freeze for up to 3 months. When ready to use, you can bake it directly from frozen—just add about 5 minutes to the baking time.
Q: I’m allergic to garlic. Is there an alternative that would give a similar flavor profile? If you’re allergic to garlic but still want a flavorful bread, try using shallots (finely minced) or chives as a substitute. While the flavor won’t be identical, they’ll provide an aromatic quality that works well with the butter and herbs. Alternatively, an herb butter with increased herbs and a touch of lemon zest can create a delicious garlic-free option.