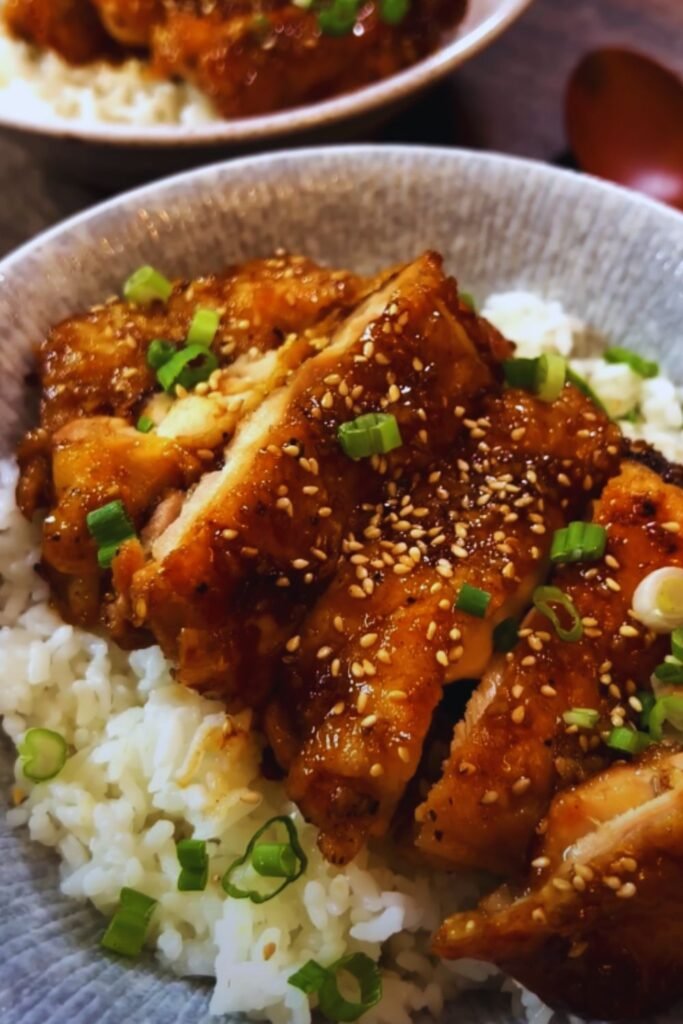
There’s something magical about the combination of honey and garlic that makes my taste buds dance with joy. As a recipe developer who has tested countless chicken dishes, I can confidently say that this Baked Honey Garlic Chicken recipe is one of my absolute favorites. The sticky, sweet, and savory glaze creates an irresistible coating that transforms ordinary chicken into a memorable meal that your family will request again and again.
Why You’ll Love This Recipe
My journey to perfecting this honey garlic chicken recipe started in my grandmother’s kitchen, where I learned that the best dishes often combine simple ingredients in thoughtful ways. This recipe embodies that philosophy perfectly, offering:
- A perfect balance of sweet honey and savory garlic
- Minimal prep time with maximum flavor
- A healthier alternative to fried chicken
- Simple ingredients you likely already have
- A versatile main dish that pairs well with various sides

Key Ingredients
The magic of this dish lies in its simple yet powerful combination of ingredients:
For the Chicken
- 8 chicken thighs (bone-in, skin-on)
- 2 tablespoons olive oil
- 1 teaspoon kosher salt
- 1/2 teaspoon black pepper
- 1 teaspoon paprika
For the Honey Garlic Sauce
- 6 cloves garlic, minced
- 1/2 cup honey
- 1/4 cup soy sauce (low-sodium)
- 2 tablespoons rice vinegar
- 1 tablespoon sesame oil
- 1 teaspoon ginger, freshly grated
- 1/4 teaspoon red pepper flakes
Kitchen Equipment Needed
Before we start cooking, let’s ensure you have all the necessary tools:
- 9×13 inch baking dish
- Small saucepan
- Mixing bowls
- Measuring cups and spoons
- Whisk
- Meat thermometer
- Aluminum foil
Step-by-Step Instructions
Preparation (15 minutes)
- Preheat your oven to 375°F (190°C)
- Pat the chicken thighs dry with paper towels
- Season chicken with salt, pepper, and paprika
- Combine sauce ingredients in a small bowl
Making the Sauce (10 minutes)
- Heat sesame oil in a small saucepan over medium heat
- Add minced garlic and sauté until fragrant (30 seconds)
- Add remaining sauce ingredients
- Simmer for 5 minutes until slightly thickened
- Remove from heat and let cool slightly
Baking the Chicken (45-50 minutes)
- Place seasoned chicken thighs in baking dish
- Pour half the sauce over the chicken
- Bake for 25 minutes
- Remove from oven and baste with remaining sauce
- Return to oven for 20-25 minutes
- Broil for 2-3 minutes for extra crispiness (optional)
Pro Tips from My Kitchen
After making this dish countless times, I’ve discovered several tricks that take it from good to great:
- Room Temperature Chicken
Let the chicken sit at room temperature for 20 minutes before cooking. This ensures even cooking and juicier meat. - Sauce Consistency
If your sauce is too thin, simmer it for an additional 2-3 minutes. If too thick, add a tablespoon of water. - Garlic Preparation
Mince the garlic just before using it. Pre-minced garlic won’t provide the same depth of flavor. - Temperature Check
Chicken is done when it reaches an internal temperature of 165°F (74°C) at the thickest part.
Common Mistakes to Avoid
- Don’t skip patting the chicken dry
- Avoid overcrowding the baking dish
- Don’t substitute dried ginger for fresh
- Never use dark soy sauce without adjusting salt content
Storage and Reheating
Storage
- Refrigerator: Store in an airtight container for up to 4 days
- Freezer: Can be frozen for up to 3 months
Reheating
- Oven Method (Recommended)
- Preheat to 350°F (175°C)
- Place chicken in a covered dish
- Heat for 15-20 minutes
- Microwave Method
- Place chicken on a microwave-safe plate
- Cover with a damp paper towel
- Heat in 30-second intervals
Serving Suggestions
I love serving this dish with:
- Steamed jasmine rice
- Roasted broccoli
- Asian-style coleslaw
- Stir-fried vegetables
- Quinoa or cauliflower rice for a low-carb option
Nutritional Information
Per serving (1 chicken thigh with sauce):
- Calories: 385
- Protein: 28g
- Carbohydrates: 18g
- Fat: 24g
- Fiber: 0.5g
- Sugar: 16g
- Sodium: 680mg
Variations and Substitutions
Protein Options
- Chicken breast (adjust cooking time to 25-30 minutes)
- Boneless thighs (reduce cooking time by 10 minutes)
- Tofu (extra-firm, pressed)
Sauce Adaptations
- Spicy: Double the red pepper flakes
- Low-sugar: Use sugar-free honey substitute
- Gluten-free: Use tamari instead of soy sauce
Frequently Asked Questions
Q: Can I use boneless chicken breasts instead of thighs?
A: Yes, but reduce the cooking time to 25-30 minutes and check the internal temperature to avoid overcooking.
Q: How do I know when the chicken is done?
A: The internal temperature should reach 165°F (74°C), and the juices should run clear when pierced.
Q: Can I make this dish ahead of time?
A: Yes! Prepare the sauce up to 3 days ahead and store in the refrigerator. You can also season the chicken a day in advance.
Q: What if my sauce isn’t thickening?
A: Simmer for an additional 3-5 minutes, or create a cornstarch slurry (1 teaspoon cornstarch mixed with 1 tablespoon water) and add to the sauce.
Q: Is this recipe gluten-free?
A: Not as written, but you can make it gluten-free by substituting soy sauce with tamari or coconut aminos.
Troubleshooting Tips
If you encounter any of these common issues, here’s how to fix them:
Sauce Too Thin
- Simmer longer
- Add cornstarch slurry
- Reduce honey slightly
Chicken Not Browning
- Ensure oven is fully preheated
- Pat chicken extra dry
- Brush with oil before baking
- Use the broiler for 2-3 minutes at the end
Sauce Burning
- Lower oven temperature by 25 degrees
- Add a splash of water
- Cover with foil
- Apply second sauce layer later in cooking
This Baked Honey Garlic Chicken recipe has become one of my signature dishes, and I’m confident it will become a favorite in your household too. Remember, cooking is about experimentation and finding what works best for your taste buds. Don’t be afraid to adjust the seasonings to your liking, and most importantly, enjoy the process!