Nothing quite captures the essence of summer comfort food like a warm, bubbling cobbler fresh from the oven. I’ve spent countless hours perfecting this skillet strawberry cobbler recipe, and I can confidently say it’s become my go-to dessert for everything from casual weeknight treats to special family gatherings. The combination of sweet, juicy strawberries nestled beneath tender, cream cheese-swirled biscuits creates a dessert that’s both rustic and refined.
What makes this recipe truly special is the use of a cast-iron skillet, which provides even heat distribution and creates those coveted crispy edges that everyone fights over. The cream cheese swirl adds an unexpected richness that elevates ordinary biscuits into something extraordinary. I discovered this technique during one of my experimental baking sessions, and it’s been a game-changer ever since.
Understanding Cobbler: A Sweet Definition
Cobbler: A baked dessert consisting of a fruit filling topped with a biscuit, dumpling, or pastry crust. Unlike pies, cobblers have no bottom crust and are typically served warm with ice cream or whipped cream.
Skillet Baking: A cooking method that utilizes a heavy-bottomed pan, usually cast iron, to create even heat distribution and enhanced flavor development through caramelization.
Cream Cheese Swirl: A technique where softened cream cheese is dolloped and gently mixed into dough to create marbled patterns and add richness.
Maceration: The process of drawing out fruit juices by combining fruit with sugar, which creates a natural syrup and intensifies flavors.
The Science Behind Perfect Cobbler
Understanding the mechanics behind cobbler-making has transformed my approach to this dessert. The key lies in balancing moisture levels between the fruit filling and the topping. When strawberries release their juices during baking, they create steam that helps cook the biscuit topping from below while the oven heat cooks it from above.
The cast-iron skillet plays a crucial role in this process. Its thermal mass retains heat exceptionally well, creating a consistent temperature that prevents soggy bottoms while ensuring the fruit cooks evenly. I’ve found that preheating the skillet before adding the fruit mixture gives an extra boost to the cooking process.
Essential Ingredients Breakdown
| Ingredient Category | Specific Items | Purpose | Quality Tips |
|---|---|---|---|
| Fresh Fruit | 2 lbs fresh strawberries | Primary flavor base | Choose firm, bright red berries with green tops |
| Sweeteners | Granulated sugar, brown sugar | Balance tartness, create syrup | Use a 2:1 ratio of white to brown sugar |
| Dairy Components | Cream cheese, heavy cream, butter | Richness and texture | All ingredients should be at room temperature |
| Flour & Leavening | All-purpose flour, baking powder, salt | Structure and rise | Fresh baking powder ensures proper lift |
| Flavor Enhancers | Vanilla extract, lemon zest, cinnamon | Depth and complexity | Pure vanilla extract makes a noticeable difference |
Step-by-Step Preparation Guide
Preparing the Strawberry Filling
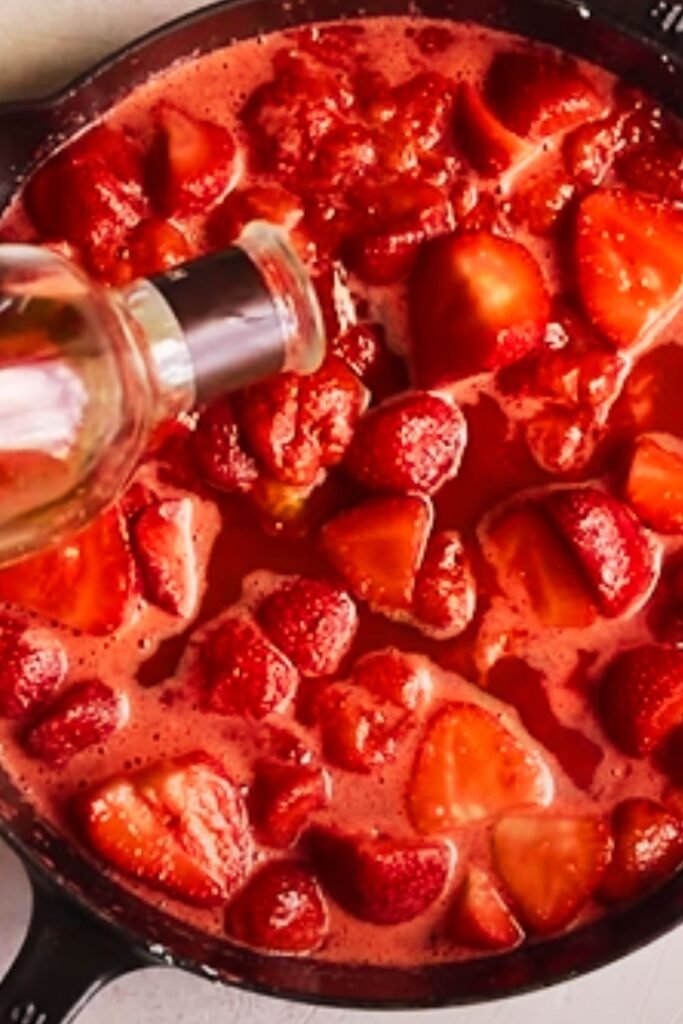
I start by hulling and slicing my strawberries into uniform pieces, roughly quarter-inch thick. This ensures even cooking and prevents some pieces from turning to mush while others remain firm. The maceration process begins here – I combine the sliced strawberries with granulated sugar, a touch of brown sugar for depth, and fresh lemon juice.
The magic happens during the 15-minute resting period. As the strawberries sit with the sugar, they release their natural juices, creating a beautiful syrup that will bubble and caramelize during baking. I often add a tablespoon of cornstarch to this mixture, which helps thicken the juices without making the filling gummy.
Creating the Cream Cheese Swirled Biscuits
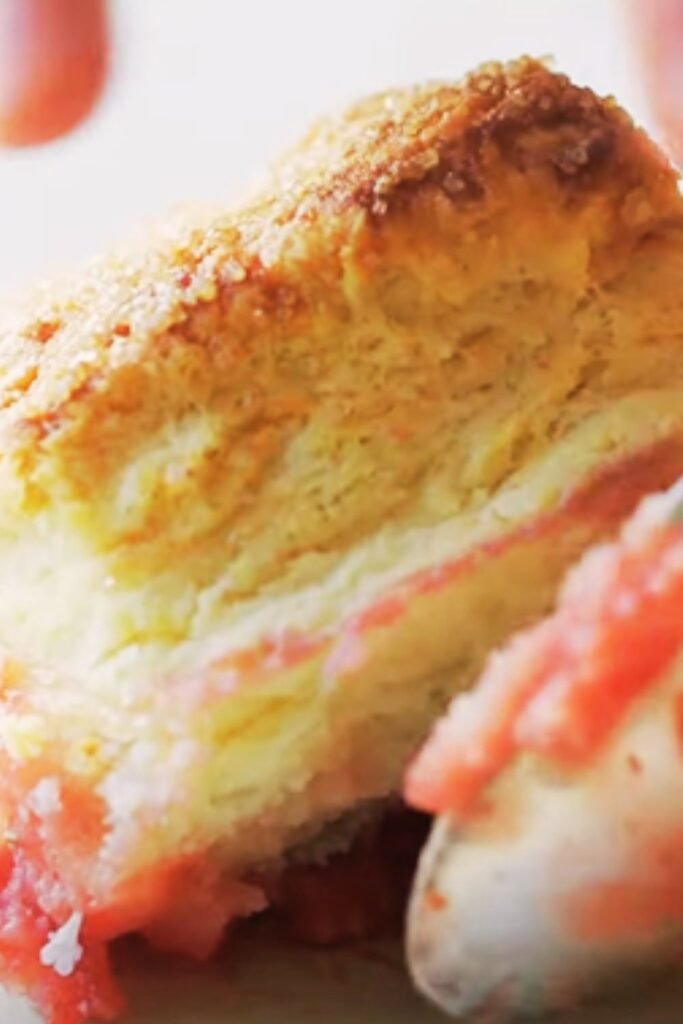
The biscuit topping is where this recipe truly shines. I begin with a standard biscuit base – flour, baking powder, salt, and cold butter cut into small cubes. The key to tender biscuits lies in keeping the butter cold and working it just enough to create pea-sized pieces throughout the flour mixture.
For the cream cheese component, I soften an 8-ounce package to room temperature and blend it with a touch of powdered sugar and vanilla. This mixture gets dolloped throughout the biscuit dough and gently folded to create marbled streaks. The result is pockets of tangy richness that complement the sweet strawberries perfectly.
Baking Techniques and Temperature Control
| Baking Stage | Temperature | Duration | Visual Cues |
|---|---|---|---|
| Initial Bake | 425°F (220°C) | 15 minutes | Biscuits begin to set |
| Reduced Heat | 375°F (190°C) | 20-25 minutes | Golden brown tops |
| Final Check | 375°F (190°C) | 5-10 minutes | Bubbling edges |
| Rest Period | Room temperature | 10 minutes | Juices settle |
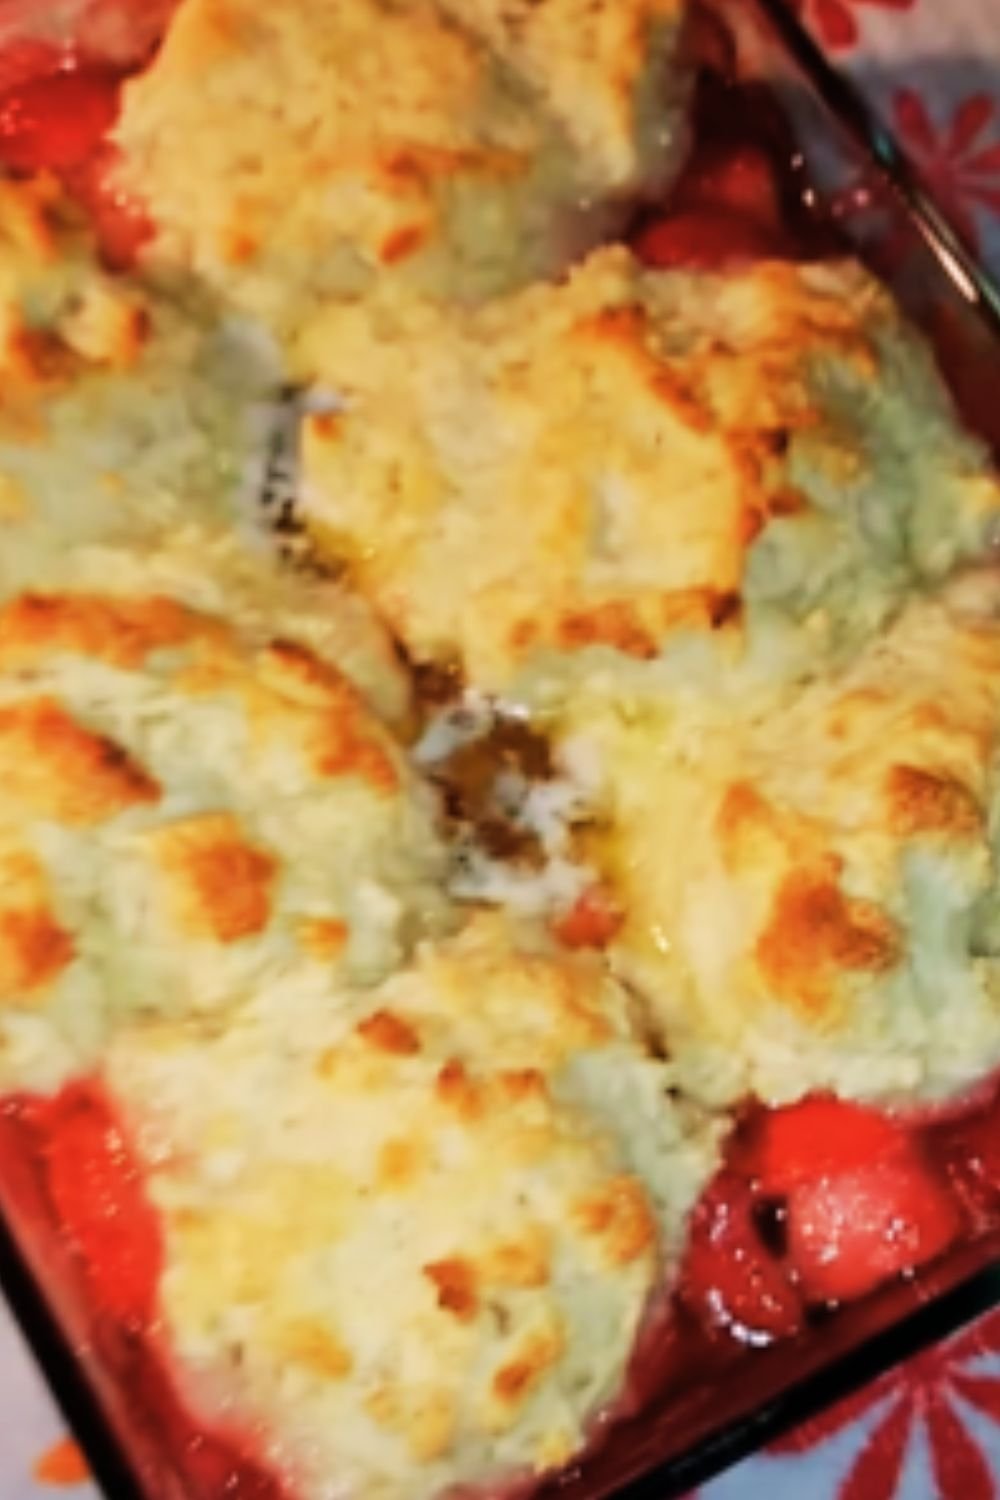
Preheating my 10-inch cast-iron skillet in the oven while I prepare the components ensures everything starts cooking immediately. I pour the macerated strawberries into the hot skillet, listening for that satisfying sizzle that tells me the caramelization process has begun.
The biscuit topping gets dropped in generous spoonfuls over the fruit, leaving some gaps for the strawberry juices to bubble through. This creates those irresistible crispy-edged pockets that make skillet cobblers so appealing.
Troubleshooting Common Issues
Through years of cobbler-making, I’ve encountered and solved numerous challenges. Soggy biscuits typically result from too much moisture in the fruit or insufficient oven temperature. I combat this by ensuring my strawberries aren’t overly wet and maintaining proper heat levels throughout baking.
Uneven browning often occurs when the skillet isn’t properly preheated or positioned incorrectly in the oven. I’ve learned to place my skillet on the lower third of the oven rack, which allows the bottom to cook thoroughly while preventing the top from over-browning.
Seasonal Variations and Substitutions
| Fruit Combination | Adjustments Needed | Flavor Profile |
|---|---|---|
| Strawberry-Rhubarb | Add 1 cup diced rhubarb, increase sugar by 2 tbsp | Tart and complex |
| Mixed Berry | Equal parts strawberries, blueberries, raspberries | Rich and jammy |
| Strawberry-Peach | Replace 1 lb strawberries with sliced peaches | Sweet and summery |
| Strawberry-Apple | Add 2 Granny Smith apples, extend baking time | Balanced sweet-tart |
Serving Suggestions and Accompaniments
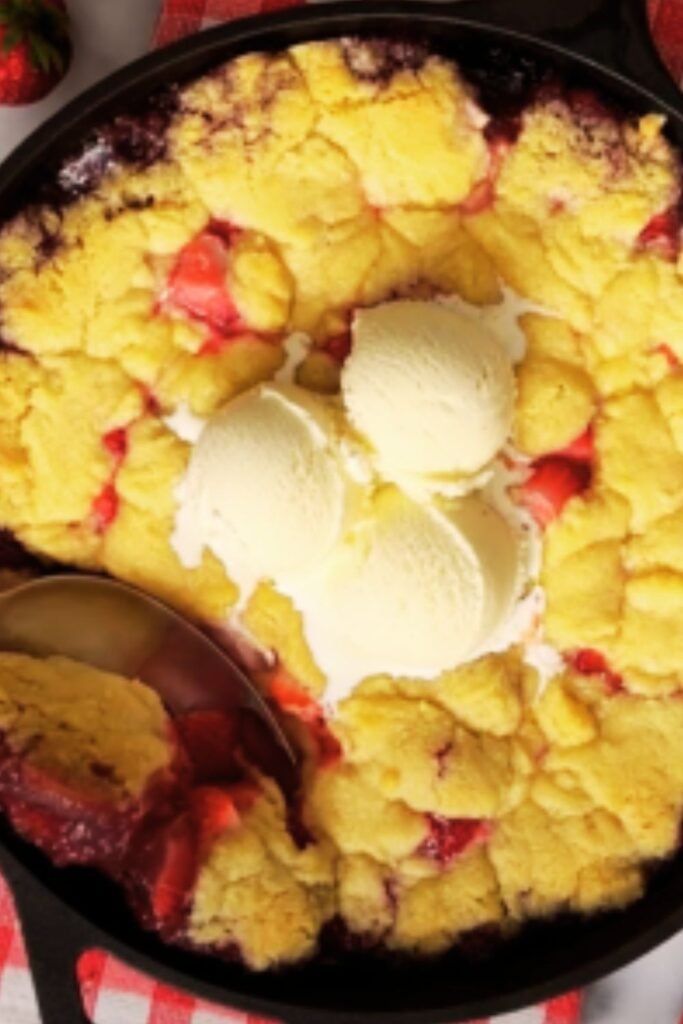
The beauty of this cobbler lies in its versatility. I serve it warm from the skillet, allowing guests to admire the rustic presentation before diving in. A scoop of vanilla bean ice cream creates the perfect temperature contrast, while the cold creaminess balances the warm, sweet fruit.
For special occasions, I prepare fresh whipped cream with a touch of vanilla and powdered sugar. The light, airy texture complements the dense biscuit topping beautifully. Alternatively, a dollop of crème fraîche adds sophisticated tanginess that elevates the entire dessert.
Storage and Reheating Guidelines
Proper storage ensures this cobbler maintains its quality for several days. I cover the cooled cobbler tightly with plastic wrap or transfer individual portions to airtight containers. Refrigerated, it keeps well for up to four days, though the biscuit topping will soften slightly.
For reheating, I prefer using a 350°F oven for 10-15 minutes, which helps restore some crispness to the topping. Individual portions work well in the microwave for 30-45 seconds, though the texture won’t be quite as appealing as oven-reheated portions.
Nutritional Considerations and Modifications
| Modification Type | Substitution | Impact on Texture | Impact on Flavor |
|---|---|---|---|
| Reduced Sugar | Replace half sugar with stevia blend | Minimal change | Slightly less caramelization |
| Gluten-Free | Use 1:1 gluten-free flour blend | Slightly denser biscuits | Nearly identical |
| Dairy-Free | Coconut cream + vegan butter | Different mouthfeel | Subtle coconut notes |
| Lower Fat | Greek yogurt in biscuits | Tangier, denser texture | More pronounced tartness |
Understanding these modifications has helped me accommodate various dietary needs without sacrificing the essence of this beloved dessert. The key is making one substitution at a time to understand how each change affects the final product.
Advanced Techniques for Excellence
My most successful cobblers incorporate several professional techniques. I brush the biscuit tops with heavy cream before baking, which creates a beautiful golden color and adds richness. Sprinkling coarse sugar over the cream creates delightful textural contrast.
Another technique I’ve adopted is creating small wells in the biscuit topping using the back of a spoon. These depressions collect the bubbling fruit juices, creating concentrated pockets of flavor that make each bite special.
Seasonal Shopping and Ingredient Selection
Peak strawberry season typically runs from late spring through early summer, varying by region. I look for berries that are deep red throughout, avoiding those with white or green shoulders. The aroma should be sweet and intense – if I can’t smell the strawberries, they likely lack flavor.
For the best results, I avoid pre-packaged strawberries when possible, opting instead for those sold loose where I can inspect each berry. Slightly underripe berries actually work well in cobblers since they’ll soften during baking without becoming mushy.
Equipment Essentials and Alternatives
While I strongly prefer cast iron for this recipe, a heavy ceramic baking dish or enameled cast iron works adequately. The key is using something that retains and distributes heat evenly. I avoid thin metal pans, which can create hot spots and uneven cooking.
My 10-inch cast-iron skillet perfectly accommodates this recipe’s proportions, but a 12-inch skillet works if you want thinner layers. Smaller 8-inch skillets require reducing the recipe by about one-third to prevent overflow.
Professional Tips for Home Bakers
Temperature consistency makes the difference between good and exceptional cobblers. I use an oven thermometer to verify accuracy, as many home ovens run hot or cold. Rotating the skillet halfway through baking ensures even browning, especially in ovens with uneven heat distribution.
The doneness test involves checking that the biscuit tops spring back when lightly touched and that the fruit juices bubble vigorously around the edges. Underbaked cobblers will have raw flour taste, while overbaked ones become dry and tough.
Q&A Section
Q: Can I use frozen strawberries instead of fresh ones? I’ve successfully used frozen strawberries, though the results differ slightly. Thaw them completely and drain excess liquid before macerating. The texture will be softer, but the flavor remains excellent. Add an extra tablespoon of cornstarch to handle the additional moisture.
Q: How far in advance can I prepare this cobbler? You can assemble the entire cobbler up to 4 hours before baking, keeping it covered in the refrigerator. The biscuit topping may spread slightly, but this doesn’t affect the final result. Add 5-10 minutes to the baking time if starting from cold.
Q: What’s the best way to prevent soggy bottoms in my cobbler? Preheating your skillet is crucial, as is avoiding overly juicy fruit. I sometimes place the filled skillet on the stovetop for 2-3 minutes before transferring to the oven, which jump-starts the cooking process and reduces excess moisture.
Q: Can I make individual serving cobblers using this recipe? Absolutely! Divide the fruit mixture among 6-8 individual ramekins or small cast-iron skillets. Reduce the baking time to 15-20 minutes total, watching for golden-brown tops and bubbling fruit.
Q: Why do my biscuits sometimes sink into the fruit? This usually happens when the fruit mixture is too thin or the biscuit dough is too wet. Ensure your fruit has had time to macerate and thicken, and avoid overmixing the biscuit dough. The cream cheese should be incorporated gently to maintain structure.
Q: How can I tell when the cobbler is perfectly done? Look for golden-brown biscuit tops that spring back when lightly touched, and fruit that bubbles actively around the edges. The internal temperature should reach 190°F if you’re using a thermometer. The aroma will be intensely fruity and sweet.
Q: What’s the secret to getting those beautiful cream cheese swirls? Room temperature cream cheese is essential – cold cream cheese won’t incorporate smoothly. Add it in dollops throughout the dough, then use a butter knife to gently fold and create marble patterns. Don’t overmix, or you’ll lose the distinctive swirls.
This skillet strawberry cobbler with cream cheese swirled biscuits represents everything I love about home baking – it’s approachable yet impressive, comforting yet sophisticated. The combination of techniques and flavors creates a dessert that’s become my signature dish, one that never fails to bring smiles and requests for the recipe. Whether you’re feeding family on a quiet evening or entertaining guests for a special occasion, this cobbler delivers warmth, flavor, and satisfaction in every spoonful.