There’s something undeniably comforting about biting into a perfectly crispy chicken tender. That satisfying crunch giving way to juicy, tender chicken is a combination that appeals to both kids and adults alike. While the original recipe might be well-known, I’ve spent years perfecting my own version of these beloved chicken tenders that delivers all the crunch and flavor without the deep fryer. My baked breaded chicken tenders are not only healthier than their fried counterparts but are also incredibly easy to make at home with pantry staples you likely already have on hand.
In this article, I’ll share my fool-proof method for creating restaurant-quality chicken tenders in your oven. I’ve tested countless variations to bring you a recipe that guarantees that perfect golden crust while keeping the chicken incredibly moist. Whether you’re cooking for picky eaters, preparing a quick weeknight dinner, or looking for a crowd-pleasing appetizer, these homemade chicken tenders are sure to become a staple in your recipe collection.
What Makes These Chicken Tenders Special
Before diving into the recipe, let me share what makes these baked chicken tenders stand out:
- Oven-Baked Perfection: These tenders achieve a wonderfully crispy exterior without deep frying, making them a healthier alternative that doesn’t sacrifice texture or flavor.
- Double Breading Technique: My special double-dredging method ensures maximum crunch and prevents the dreaded soggy breading.
- Flavor-Packed Breading: The seasoning blend in the breading mixture delivers layers of flavor in every bite.
- Versatility: These tenders pair perfectly with countless dipping sauces and sides, making them endlessly customizable.
- Family-Friendly: This recipe has been kid-tested and approved while still sophisticated enough for adult palates.
Now, let’s gather our ingredients and get cooking!
Ingredients You’ll Need
For this recipe, I’ve carefully selected ingredients that work together to create the perfect balance of flavor and texture:
For the Chicken:
- 2 pounds chicken tenderloins (about 10-12 pieces)
- 1 teaspoon kosher salt
- 1/2 teaspoon fresh ground black pepper
For the Breading Station:
- 1 cup all-purpose flour
- 1 tablespoon garlic powder
- 1 tablespoon onion powder
- 2 teaspoons paprika (regular or smoked)
- 1 teaspoon dried oregano
- 1 teaspoon dried thyme
- 1/2 teaspoon cayenne pepper (optional, adjust to taste)
- 1 teaspoon salt
- 1/2 teaspoon black pepper
- 3 large eggs
- 3 tablespoons milk
- 2 cups panko breadcrumbs
- 1 cup regular breadcrumbs
- 1/2 cup grated parmesan cheese
- 3 tablespoons olive oil or melted butter
Equipment Needed:
- Baking sheet
- Parchment paper or aluminum foil
- Wire rack (optional but recommended)
- 3 shallow dishes for breading station
- Tongs
- Meat thermometer (optional)
Step-by-Step Instructions
Follow these detailed steps to achieve perfectly crispy baked chicken tenders every time:
1. Prepare the Chicken
- Preheat your oven to 425°F (220°C). This high temperature is crucial for achieving a crispy exterior.
- Line a baking sheet with parchment paper or aluminum foil. If you have a wire rack that fits your baking sheet, place it on top – this allows hot air to circulate around the entire tender, resulting in even crispiness.
- Pat the chicken tenderloins dry with paper towels. This step is essential as excess moisture will prevent the breading from adhering properly and can lead to soggy results.
- Season the chicken directly with 1 teaspoon of kosher salt and 1/2 teaspoon of black pepper, ensuring all pieces are evenly coated.
- If your chicken tenderloins are particularly large or uneven, consider slicing them lengthwise to create more uniform pieces or gently pounding them to an even thickness.
2. Set Up Your Breading Station
Setting up an efficient breading station is the key to success with this recipe. I like to arrange my breading station in a specific order to minimize mess and maximize efficiency:
- First Station (Flour Mixture): In a shallow dish, combine the flour, garlic powder, onion powder, paprika, dried oregano, dried thyme, cayenne pepper (if using), salt, and black pepper. Whisk thoroughly to ensure even distribution of the seasonings.
- Second Station (Egg Wash): In another shallow dish, beat the eggs and milk together until well combined. This mixture helps the breading adhere to the chicken and provides moisture.
- Third Station (Breadcrumb Mixture): In a third shallow dish, mix together the panko breadcrumbs, regular breadcrumbs, and grated parmesan cheese. Drizzle the olive oil or melted butter over the mixture and use your fingers to incorporate it evenly. This step is my secret weapon – the oil helps the breadcrumbs brown beautifully in the oven, mimicking the golden color you’d get from frying.
3. Bread the Chicken Tenders
Now comes the fun part – breading the chicken! This is where my double-breading technique comes into play:
- Take one seasoned chicken tender and dredge it thoroughly in the flour mixture. Shake off any excess.
- Dip the floured tender into the egg wash, ensuring it’s completely coated.
- Transfer to the breadcrumb mixture and press the crumbs firmly onto all sides of the chicken to ensure good adhesion.
- For extra crispiness, repeat steps 2-3: dip the breaded tender back into the egg wash and then into the breadcrumb mixture for a second coating.
- Place the breaded tender on the prepared baking sheet or wire rack, leaving a bit of space between each piece.
- Repeat with all remaining chicken tenders.
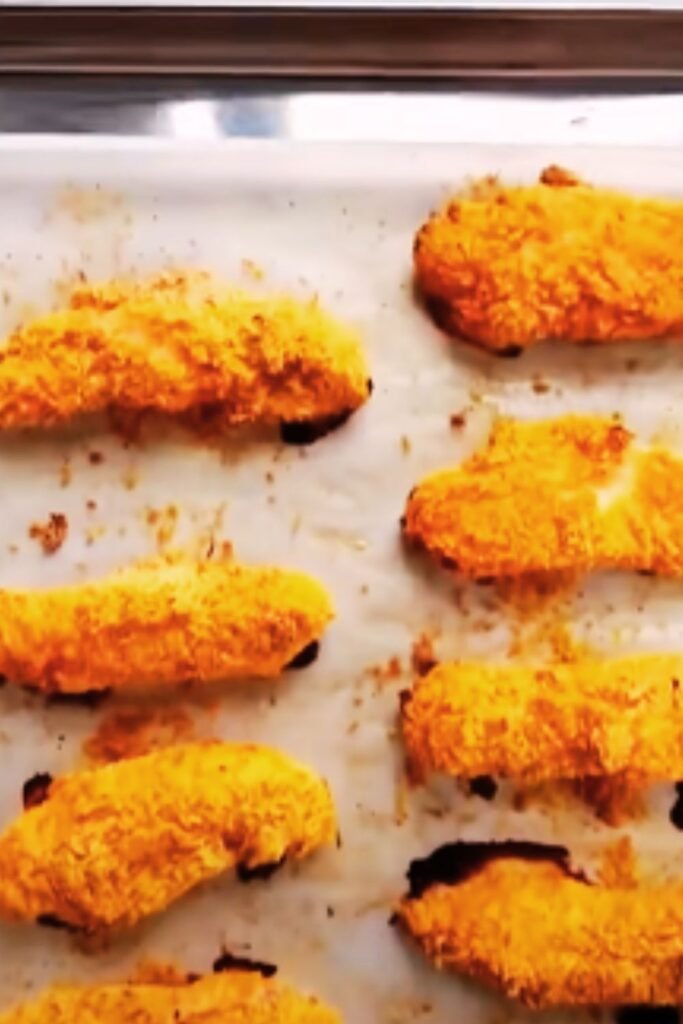
4. Bake to Perfection
- Spray the breaded tenders lightly with cooking spray for added browning (optional but recommended).
- Place the baking sheet in the preheated oven and bake for 15-20 minutes, until the breading is golden brown and crispy.
- For the most even browning, flip the tenders halfway through the cooking time.
- The chicken is done when it reaches an internal temperature of 165°F (74°C) and the breading is crisp and golden. If you don’t have a meat thermometer, cut into the thickest part of a tender – the meat should be opaque with no pink remaining.

Pro Tips for Perfect Chicken Tenders
Through my many trials perfecting this recipe, I’ve discovered several tricks that make a significant difference:
- Don’t Skip the Drying Step: Pat those chicken tenders dry before seasoning. Excess moisture is the enemy of crispiness!
- Season the Chicken Directly: Adding salt and pepper directly to the chicken (not just the breading) ensures the meat itself is well-flavored.
- Keep One Hand Dry: When breading, designate one hand for wet ingredients and one for dry to prevent your fingers from becoming breaded themselves.
- Press Firmly: Really press those breadcrumbs onto the chicken to ensure they stick throughout the baking process.
- Use a Wire Rack: Baking the tenders on a wire rack allows hot air to circulate underneath, preventing soggy bottoms.
- Don’t Overcrowd: Leave space between each tender on the baking sheet to allow for proper air circulation and even crisping.
- Check Temperature: If possible, use a meat thermometer to ensure your chicken is perfectly cooked without cutting into it and losing precious juices.
- Rest Before Serving: Allow the tenders to rest for 3-5 minutes after removing them from the oven. This helps the juices redistribute and the crust set.
Time-Saving Variations
While I love the recipe as written, I understand that sometimes you need to get dinner on the table quickly. Here are some time-saving variations:
Quick Single Coat
If you’re short on time, you can skip the double-breading process. The tenders won’t be quite as crispy, but they’ll still be delicious.
Make-Ahead Options
- Prep Ahead: Set up your breading station and season your chicken up to a day in advance. Keep components refrigerated separately until ready to bread and bake.
- Freeze Uncooked: Bread the chicken tenders, place them on a baking sheet in a single layer, and freeze until solid. Transfer to a freezer bag and store for up to 3 months. When ready to cook, add 5-7 minutes to the baking time, no need to thaw.
- Freeze Cooked: Fully bake the tenders, cool completely, then freeze. Reheat in a 375°F oven for 10-15 minutes until warmed through and crispy again.
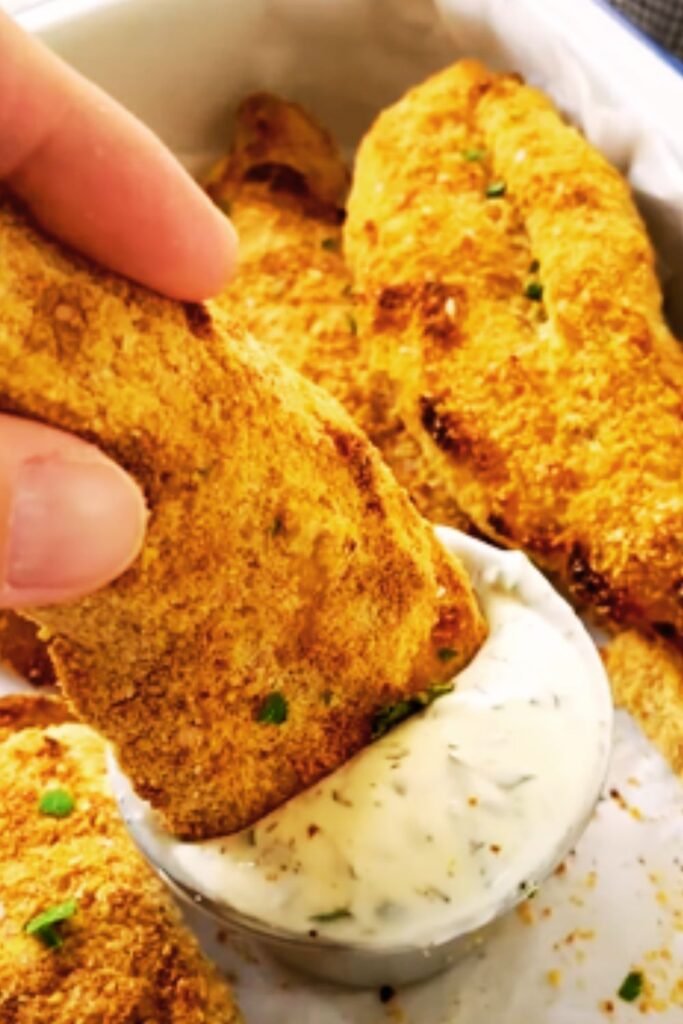
Delicious Dipping Sauces
No chicken tender is complete without a delicious dipping sauce! Here are some of my favorite homemade options:
Classic Honey Mustard
- 1/4 cup dijon mustard
- 1/4 cup honey
- 2 tablespoons mayonnaise
- 1 teaspoon apple cider vinegar
- Pinch of salt and pepper
Spicy Ranch
- 1/2 cup ranch dressing
- 2 tablespoons hot sauce
- 1/4 teaspoon cayenne pepper
- 1/4 teaspoon garlic powder
Tangy BBQ Sauce
- 1/2 cup ketchup
- 2 tablespoons brown sugar
- 1 tablespoon molasses
- 1 tablespoon Worcestershire sauce
- 1 teaspoon liquid smoke
- 1 teaspoon garlic powder
- 1 teaspoon onion powder
- 1/2 teaspoon smoked paprika
- 1/4 teaspoon cayenne pepper
Garlic Parmesan Sauce
- 1/4 cup mayonnaise
- 1/4 cup sour cream
- 2 tablespoons grated parmesan cheese
- 1 clove garlic, minced
- 1 teaspoon lemon juice
- 1/2 teaspoon dried Italian herbs
- Salt and pepper to taste
Serving Suggestions
These baked chicken tenders are incredibly versatile and can be served in numerous ways:
Complete Meal Ideas
| Meal Type | Side Dishes | Additional Components | Presentation Tips |
|---|---|---|---|
| Family Dinner | Roasted garlic mashed potatoes, steamed broccoli | Honey mustard dipping sauce | Serve family-style on a large platter with small bowls of dipping sauces |
| Casual Lunch | Sweet potato fries, coleslaw | Spicy ranch dip | Present in paper-lined baskets for a fun diner feel |
| Kid-Friendly | Mac and cheese, carrot sticks | Ketchup or BBQ sauce | Cut tenders into “nugget” sizes for little hands |
| Game Day Spread | Loaded potato skins, celery and carrot sticks | Buffalo sauce, blue cheese dip | Arrange on a tiered party tray with other appetizers |
| Healthy Option | Quinoa salad, roasted vegetables | Greek yogurt tzatziki | Serve on a bed of mixed greens with lemon wedges |
| Taco Tuesday Twist | Mexican rice, black beans | Avocado crema, pico de gallo | Slice tenders and serve with warm tortillas for chicken tender tacos |
Simple Sides That Pair Perfectly
- Fresh garden salad with vinaigrette
- Crispy roasted potatoes
- Steamed seasonal vegetables
- Buttered corn on the cob
- Creamy coleslaw
- Garlic bread
- Macaroni and cheese
Nutritional Information
For those keeping track of their nutrition, here’s an approximate breakdown per serving (2-3 chicken tenders):
| Nutrient | Amount |
|---|---|
| Calories | 320 |
| Protein | 29g |
| Carbohydrates | 28g |
| Fat | 12g |
| Saturated Fat | 3g |
| Fiber | 1.5g |
| Sugar | 1g |
| Sodium | 650mg |
Note: Values are approximate and may vary based on specific ingredients used and exact portion sizes.
Dietary Adaptations
This versatile recipe can be adapted to accommodate various dietary needs:
Gluten-Free Version
- Substitute all-purpose flour with gluten-free flour blend
- Use gluten-free breadcrumbs or crushed gluten-free corn flakes/rice cereal
- Verify all other ingredients (like spices) are certified gluten-free
Dairy-Free Version
- Omit parmesan cheese or substitute with nutritional yeast for a cheesy flavor
- Use plant-based milk in the egg wash
- Use olive oil instead of butter in the breadcrumb mixture
Lower-Carb Option
- Replace some or all breadcrumbs with crushed pork rinds
- Add extra parmesan cheese to the coating mixture
- Consider almond flour as a partial substitute for all-purpose flour
Egg-Free Version
- Replace egg wash with 1/2 cup buttermilk or 1/4 cup mayonnaise thinned with a tablespoon of water
- Alternatively, use a flax egg (1 tablespoon ground flaxseed mixed with 3 tablespoons water, left to gel for 5 minutes)
Troubleshooting Common Issues
Even with the best recipe, sometimes things don’t go as planned. Here are solutions to common chicken tender problems:
Breading Falls Off
- Possible Cause: Chicken was too wet or not pressed firmly enough into the breading
- Solution: Ensure chicken is thoroughly dried before breading and really press the breadcrumbs onto the chicken. Also, allow the breaded tenders to rest for 5-10 minutes before baking to help the coating adhere.
Not Crispy Enough
- Possible Cause: Oven temperature too low or tenders placed too close together
- Solution: Verify your oven temperature with an oven thermometer, increase temperature by 25°F, use a wire rack, and ensure proper spacing between tenders.
Too Dry
- Possible Cause: Overcooked or started with very thin chicken pieces
- Solution: Use a meat thermometer to avoid overcooking and remove from oven as soon as they reach 165°F. Consider brining the chicken beforehand for extra juiciness.
Bland Flavor
- Possible Cause: Insufficient seasoning or seasoning only the breading
- Solution: Season the chicken directly before breading and don’t be shy with spices in your flour and breadcrumb mixtures.
Frequently Asked Questions
Q: Can I use chicken breasts instead of tenderloins? A: Absolutely! Simply slice boneless, skinless chicken breasts into 1-inch thick strips. You may need to adjust the cooking time slightly depending on the thickness.
Q: How do I know when the chicken tenders are done? A: The most reliable method is using a meat thermometer – chicken is safe to eat when it reaches an internal temperature of 165°F (74°C). Visually, the breading should be golden brown and crispy, and when cut, the meat should be opaque with no pink remaining.
Q: Can I make these in an air fryer? A: Yes! Air fry at 400°F for about 10-12 minutes, flipping halfway through. You may need to work in batches depending on the size of your air fryer.
Q: My tenders always seem to come out soggy on the bottom. How can I prevent this? A: Using a wire rack is the best solution as it allows air to circulate underneath the tenders. If you don’t have one, flip the tenders halfway through cooking to ensure even browning.
Q: Can I use this same technique for other meats? A: Absolutely! This breading method works wonderfully for pork cutlets, fish fillets, or even firm tofu slices. Just adjust cooking times accordingly for each protein.
Q: How do I store and reheat leftovers? A: Store leftovers in an airtight container in the refrigerator for up to 3 days. For best results, reheat in a 375°F oven for 10-15 minutes until heated through and crispy again. Avoid microwaving if possible as it will make the breading soggy.
Q: What’s the best way to freeze these chicken tenders? A: You can freeze these either before or after cooking. For uncooked tenders, freeze them on a baking sheet until solid, then transfer to a freezer bag. For cooked tenders, cool completely before freezing. In both cases, they’ll keep for up to 3 months.
Q: Can I make the breading spicier? A: Definitely! Increase the cayenne pepper to 1 teaspoon, add 1/2 teaspoon of red pepper flakes, or mix in 1 tablespoon of hot sauce into the egg wash for an extra kick.
Why These Baked Tenders Beat Fried Versions
Having experimented with both fried and baked chicken tenders extensively, I’m convinced that these baked versions are superior for several reasons:
- Health Benefits: Baking uses significantly less oil than frying, resulting in a lighter meal with fewer calories and less fat while still delivering that satisfying crunch.
- Less Mess: No splattered oil all over your stovetop or the lingering smell of fried food in your kitchen for days.
- More Even Cooking: Baking at a consistent temperature allows for more even cooking, reducing the risk of burnt exteriors and undercooked interiors that can happen with frying.
- Hands-Off Cooking: Once they’re in the oven, you’re free to prepare side dishes or dipping sauces instead of standing over a hot pan of oil.
- Better Flavor Development: The longer cooking time allows flavors to develop more fully, especially when using herbs and spices in the breading.
I’ve served these at countless family dinners, gatherings with friends, and even for picky eaters, and they’ve always been a hit. The most common reaction I get is disbelief that something so crispy and delicious could come from the oven rather than the deep fryer.
Final Thoughts
Creating the perfect baked breaded chicken tender is something of an art form, but with this recipe and techniques, you’re well-equipped to master it. What I love most about this dish is its ability to please everyone at the table while still being a healthier alternative to traditional fried versions.
Remember that practice makes perfect, and don’t be afraid to adjust the seasonings to suit your family’s taste preferences. Whether you’re making these for a quick weeknight dinner, a game day snack, or a kid-friendly meal, I’m confident these crispy, juicy chicken tenders will become a regular in your recipe rotation.
I’d love to hear how these turn out for you! Feel free to experiment with different seasonings and dipping sauces to make this recipe your own. Happy cooking!